A Short Introduction

Since I was introduced glitch art last May I’ve really been hooked on exploring this technique and how it can affect my artwork. One thing that I’ve never done is to explain why I do this, so here it goes!

For me glitch art is about exploring the boundaries in which things will operate as expected, with particular emphasis on computers. Computers are very complex and can take years to understand understand. Computers are also very obedient. They will do what you tell them to, but you have to tell them in a way that they understand. For example, it is assumed that if you double-click on an image it will open in an image viewer or editor. This is because the image has data in it (the header data) describing what kind of file it is and when you double-click on it an instruction is sent to open that kind of file with any program that can interpret it that data.

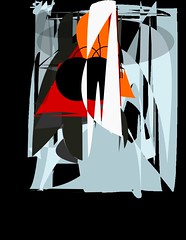
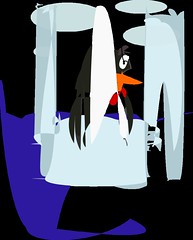
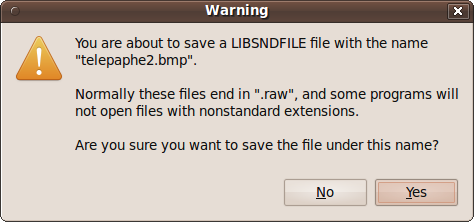
But then, what about if we fooled the computer into thinking it is opening one type of file, when in fact it is another. For example, what if we added the header data of an image file to an mp3 file and then tried to edit it in an image editor? The output is usually a burst of colourful pixels. Whilst we may perceive the output as an error and instantly discard it the computer is not as judgemental. It is devoid of emotion and doesn’t question actions and will do what we tell it to do, and so will happily do this with any data that it has been instructed to interpret.

Why would one want to do all of this? Think of the computer as a world of its own, or the human body. All of the underlying code and hardware relies on each other for it to operate successfully. Should one part become damaged it can sometimes be fatal, but often the overall ability to operate is hampered. How far can I push a piece of hardware or software before it either breaks itself or the whole computer? You can easily relate this to athletes who constantly put their bodies through hours of physically demanding activity in order to push the boundaries in which their bodies will operate. In either case, at what point will you reach the limits?

More importantly, what can be discovered by doing all of this? New, hidden abilities that we didn’t know our computers had, improved performance, increased knowledge of how things work, a new form of art, or something else? Well, that’s what I want to find out.

It’s Just Noise!

As readers of my blog will know by now you can easily import any data into audacity and play it as audio. However, most data that you’ll import and then play will just turn out as noise. That is simply because there’s too much noise in the image i.e. too many colours and too much data. So, if you reduce the amount of colours and data in theory you get something a little bit more pleasing to the ear. Experimentationing time!

These were my initial two shapes that I worked with:

And the resulting sound, when looped a lil’ bit:

It’s not much but it shows definite potential. I’ve yet to work out how colour affects the sound, but I’m getting there

The next logical step is to of course run a glitched image through this process! I worked with this image for the sound then used ImageMagick to crop the image to 30x30px squares and used FFmpeg to arrange them into a video.

It’s noise, but I like it 🙂

Preserving the glitch

On Thursday 4th March I took part in the AntsArtJam at BitJam in Stoke-on-Trent. Three canvases were set up on the stage and artists were invited to get creative on them as the night went on.

Antonio Roberts (by These Ants)

Photo by These Ants

Those who know me will know that live art is not something that I’ve really done before. I’ve done a fair bit of performing, but nothing like this, so it was quite an exciting challenge.

In my performance I set out to explore how to preserve glitches. Although there are no rules or even strict definitions to terms such as databending or glitch art, to me glitches are naturally occurring errors whereas databending is the act of reproducing an error. Take, for example, my Glitches set and my Databending set on Flickr. Whereas the Databending set is quite full the Glitches set has only three items. I feel this is because it’s harder to capture naturally occurring glitches as you’re often not prepared for them.

To prepare for my performance I downloaded the two movies from the Blender Foundation (Big Buck Bunny and Elephants Dream) and used a modified version of MPEGFucker to databend them. I opened them to at least see if they could be played, but otherwise had no idea what state they were in. This was then projected onto the canvas where I began to paint it.

bITjAM (by These Ants)

Photo by These Ants

I got a few questions asking how I was actually determining what to paint. Afterall, images were zooming by at 24 frames per second, so how would I decide what colour to put where? Overall I was looking for patterns. From the five or so seconds of footage that I’d see I’d try and determine what average value best represented it.

In some ways this is a randomised process. I had only seen seconds of the glitched movie prior to the performance so didn’t know what to expect. Also, marks that I made on the canvas were determined by where my brush was, what colour was on there at the time and what was being projected. To add to this throughout the three-hour performance I didn’t really get to see any of what I was painting, due to the projection onto the canvas. I’m sure there were many occasions where I painted over the same spot many many times.

Here’s the finished product, next to work by Iona Makiola

IMG_0510 (by These Ants)

Photo by These Ants

All of the work from the night, including the video footage that I used, will be exhibited as part of The Talking Shop project in Stoke-on-Trent in the near future

Visualising BitJam

On Thursday 4th February I was Stoke-on-Trent for BitJam. I still don’t have anything ready to show on stage but thought I’d use the night as a testing ground for some of my ideas. I wanted to investigate ways in which to interpret what was happening around me. The main performance of the night was from a chap called Arctic Sunrise

For my first test I fired up Alchemy and attempted to draw the music. Alchemy fortunately has a few tools that can make your sketches react to sounds. They are Create > Mic Shapes and Affect > Mic Expand. Here’s the result of using both of them together

Visualising BitJam (by hellocatfood)

And a nice little animation of those done using GIMP and Openshot.

The next method was to use the Echobender script on a webcam pointing at the stage. Obvious errors in the sound recording actually kinda complimented the video. However, I’m a lil bit disappointed by the speed of the script at the moment. I may investigate doing something similar in Processing.

The final method involved a bit of post-processing. I made a short compilation of clips I shot at BitJam and then opened the video in a text editor and replaced loads of text with other text. The output was then reencoded using Avidemux

So, there you have it! Now to figure out how I can turn this into some sort of performance

Streams of data

One of my overall goals is to find a way to databend live video. I’m sure there’s a way to do it with Processing and PureData but I’m not yet proficient in those programs so they’re out of the question for now. In the meantime I thought to try and hack the Echobender script to databend my webcam images.

>tonyg provides a great tutorial on how to convert live webcam images into audio, which I’ve used as a starting point for my hack.

The process for making it works is as follows:

  • Images from the webcam are saved to the computer
  • These are converted to a .bmp file then renamed to a .raw file
  • Sox applies an audio effect to the .raw file
  • The .raw file is converted back to a .bmp then to a .jpg
  • The updated webcam image is displayed to a window and updated once every second

Sound overly complicated? It probably is. Like the Echobender script you’ll need ImageMagick and Sox but we’ll also be using Webcam, which you can install via sudo apt-get install webcam

If you haven’t already, create a file called .webcamrc in your home directory (/home/yourusername) and enter this text into it:

[grab]
delay = 0
text = “”

[ftp]
local = 1
tmp = uploading.jpg
file = webcam.jpg
dir = .
debug = 1

Now create a file called grabframe, place it in your home directory and fill it with this:

#!/bin/sh

while [ ! -e webcam.jpg ]; do sleep 0.1; done
convert webcam.jpg frame.bmp
cp frame.bmp frame.raw
sox -r 482170 -e u-law frame.raw frame2.raw echos 0.8 0.9 5000 0.3 1800 0.25
convert -size 640x240 -depth 4 rgb:frame2.raw -trim -flip -flop output.bmp
convert output-0.bmp output.jpg

To start things running, open up three terminal instances:

  • In shell number one, run webcam.
  • In shell number two, run “while true; do ./grabframe ; done.
  • In shell number three, run display -update 1 output.jpg

Voila!

I know it’s quite slow, but I haven’t yet found a way to update faster and it’ll still be restricted by the time it takes Sox/ImageMagick to perform their conversions.

Thanks again to tonyg, Imbecil and Mez for their help and inspiration

Bull Glitch

You may have noticed that in my previous post there was a nice little image of the Bull Ring Bull. I did that! Before I go on, it’s not an image that will be used for Birmingham’s City of Culture bid (though if you really like it monies plz). It’s more an image just to represent the work that we’re doing to collect opinions of Birmingham.

bull glitch

Although not a completely original concept (Andy Warhol anyone?) I have utilised a few newly found techniques to create it. Whilst the results, and indeed databending as a whole looks cool I have yet to use it in any real world situations. Until now that is.

To begin I found an image of the Bull and cut it out of the background. I then took it into Inkscape and used the Trace Bitmap function (Alt + Shift + B) and traced it several times using different settings. I saved svgs that scanned for several different colour values. After saving a copy of the original I basically databent it i.e. replaced some numbers with other numbers using a text editor. I’ve described this process in a lot more detail in this earlier tutorial.

I still did manipulate the image afterwards (a bit of shifting of layers and colour/opacity adjustments), but the overall random effect was achieved this way. Here’s how the others turned out:

Bull Glitch (by hellocatfood)

And now we wait to see if we actually become City Of Culture

Video conversion glitch

I made this video at a training day in using Macs/video editing software with children and community groups. I completed the task as asked but then switched to my laptop, fired up kdenlive and tried to see what it was capable of. It was upon exporting to ogg that I got a nice surprise.

Whilst this kind of glitch is rather nice one must be careful not to be reliant on it for production as at any time it could be fixed. Effects such as this Photoshop truncating glitch are now only possible in Photoshop 6 as the bug that caused it has been fixed. This is why I’m now more on the lookout for programs/scripts and guaranteed methods for reproducing glitch effects. The ones that tend to be best at this are ones that can import any data, an example of this being Audacity’s ability to attempt to load any file you load into it.

Is there a list of software out there that can interpret and load any data?

Databending using Audacity

Thanks to some help on the Audacity forum I finally know out how to use Audacity to databend. Previously I’d been using mhWavEdit, which has its limitations and just doesn’t feel as familiar as Audacity. From talk on the various databending discussion boards I found that people would often use tools like Cool Edit/Adobe Audition for their bends. Being on Linux and restricting myself to things that run natively (i.e. not under Wine) presented a new challenge. Part of my task was to replicate the methods others have found but under Linux. My ongoing quest is to find things that only Linux can do, which I’m sure I’ll find when I eventually figure out how to pipe data through one program into another!

Here’s some of my current results using Audacity:

Gabe, Abbey, L and me (by hellocatfood)

Liverpool (by hellocatfood)

Just so you don’t have to go trawling through the posts on the Audacity forum here’s how it’s done. It’s worth noting that this was on using Audacity 1.3.12-2 on Linux. Versions on other operating systems may be different. Before I show you this it’s probably better if you work with an uncompressed image format, such as .bmp or .tif. As jpgs are compressed data there’s always more chance of completely breaking a picture, rather than bending it. So, open up GIMP/your faviourite image editor and convert it to an uncompressed format. I’ll be using this picture I took at a Telepaphe gig awhile back.

Next, download Audacity. You don’t need the lame plugin as we wont be exporting to mp3, though grab it if you plan to use it for that feature in the future. Once you have it open go to File > Import > Raw Data and choose your file. What you’ll now be presented is with options on how to import this raw data, which is where I would usually fall flat.

Import Raw Data

Import Raw Data

Under Encoding you’ll need to select either U-Law or A-Law (remember which one you choose). When you choose any other format you’ll be converting the data into that format. Whilst you want to achieve data modification this is bad because it’ll convert the header of the image file, thereby breaking the image. U/A-Law just imports the data. The other settings do have significance but I wont go into that here. When you’re ready press Import and you’ll see your image as data!

Image as sound

Image as sound

Press play if you dare, but I’d place money on the fact that it’ll probably sound like either white noise or Aphex Twin glitchy goodness. This is where the fun can begin. For this tutorial select everything from about five seconds into the audio. The reason for this is because, just like editing an image in a text editor, the header is at the beginning of the file. Unless you know the size of the header and exactly where it ends (which you can find out with a bit of research), you can usually guess that it’s about a few seconds into the audio. The best way to find it out is to try it out!

Anyway, highlight that section and then go to Effect > Echo

Apply the echo

Leave the default settings as they are and press OK

You’ll see that your audio has changed visually. It still wont sound any better but the magic happens when you export it back to an image file, which is the next step.

Once you’re happy with your modifications go to File > Export. Choose a new location for your image and type in the proposed new file name but don’t press save just yet. You’ll need to change the export settings to match the import settings.

screenshot_11_16_110037

Change the file format to Other Uncompressed Files and then click on the Options button.

Export settings

Export settings

Change the settings to match the ones above (or to A-Law if you imported as A-Law). With that now all set you can now press Save! If you entered a file extension when you were choosing a file name you’ll get a warning about the file extension being incorrect, but you can ignore it and press Yes. If you didn’t choose a file extension, when the file is finished exporting, add the appropriate extension to the file. In my case I’d be adding .bmp to the end.

Here’s the finished image:

Freaky!

Freaky!

There’s of course so many different filters available in Audacity, so try each of them out! If you’re feeling really adventurous try importing two or more different images and then exporting them as a single image.

Bending a penguin

Awhile back I did a quick vector illustration of a penguin. It was nothing much really but as far as penguins go I quite liked this one. Recently (as in, the last four months) I’ve been interested in databending. Have you ever had an image you’ve taken come out like it’s been through a shredder? That’s the effect that most databenders are after. In a way it’s like trying to reproduce an error. Once you’ve done it a few times you get to learn what effects different methods can produce but even then it’s very unpredictable. For a short tutorial on databending an image, take a look at the one I wrote for fizzPOP.

Penguin

My curiosity lead me to see what can be done to databend an SVG file. In a similar way to a jpg or gif they’re just data but the difference is it’s human-readable. That is, someone could look at how an SVG is created and understand it. For example this code:

<!--?xml version="1.0" encoding="UTF-8" standalone="no"?-->
<!-- Created with Inkscape (http://www.inkscape.org/) -->


..Produces this circle:

Vector Circle

With a bit of time you could easily read and write that code yourself.

So, with that in mind, using similar methods to this databending tutorial, can we apply a similar effect to the penguin? Like jpg’s etc the SVG has a header that, if modified, completely destroys the file. Using the above example the header is from lines 01 to 10. Open up your SVG in a text editor (for Windows I recommend Notepadd++, for Ubuntu/Linux Scite), cut those lines (a simple Ctrl+X will do) and then begin to edit your document!

You’ll notice that you have little flexibility with how you can modify it. With a jpg you can replace or delete any character and replace it with (almost) any other one. In an SVG if you change any of the letters then you render it useless. For example, fill is a function that defines the colour of a shape. If you changed each instance of fill to say fail it would just simply break the file. Epic Fail. What you want to do is replace numbers with other numbers. There is a danger that replacing #090909 with #0909999909 could break the colour values but so far I have encountered no problems.

Once you have replaced a few numbers paste back in the header and then save it again. Open it back up and take a look at the results! Below are a few modifications I made. The process is described in the link.

Penguin - Delete 8 Penguin - Replace 8 with 15 Penguin - Replace 8 with 1

You may find that each shape has become very warped or that the dimensions of your document have increased tenfold! That’s the beauty of the randomness that is databending.