My remake of the Alvin Lucier artwork I Am Sitting in a Room was released 10 years ago today. To mark this occasion I want to revisit how I made it and troubles I had remaking it for 2019.
In November 2019 I Am Sitting in a Room was exhibited at Gamerz Festival in Aix-en-Provence in France. It was a pretty nice surprise to be invited to exhibit that piece, especially as it was made in 2010 and hasn’t been exhibited since aroudn 2015.
The festival’s organiser, Quentin, asked if I could remake the film in HD resolution, which is 1920×1080/16:9 aspect ratio. The original video was made in the very odd resolution of 1440×1152, which is 4:3 aspect ratio. In any normal situation using filmed footage, this could be an impossible task. If you wanted to convert 4:3 to 16:9 you’d either have to stretch the footage or crop it and lose information. See these examples below:
Crop to fit
Stretch to fit
For I Am Sitting in a Room in theory this isn’t a problem as the piece is black text against a white background. So, I would just need to make the background larger and center the text.
Before going into the problems I faced remaking the piece in 16:9 it’s worth going over how it was made. Back in 2010 my programming skills were, to be blunt, crap. Making this piece required me to learn a lot about Linux, loops, automation and bash programming. Also back in 2010 I wasn’t that good at documenting my processes and so looking back at my source files some of them were not in a good state or were just missing. So, part of the following is pieced together from memory and what remains on my hard drives.
In 2009 I wrote about “glitching” SVG files and became really interested in that as a format to work with. Even today I like working with SVGs as they’re highly editable and can be used in many ways (vinyl cutting, plotting, laser printing, screen printing, web design etc).
If you’ve ever done any glitching via the command line you’ll know that you can utilise sed to automate the glitching of files. sed didn’t quite work on SVGs as it would always destroy them and so I asked Garry Bulmer to write a script to glitch SVG files. It worked great and left the SVGs in an editable state.
At some point later it was brought to my attention that font glyphs are formed in the same way as vector files in that the glyphs are made up of paths and nodes, hence why they are infinitely scalable. SVG fonts was/is a specification for, well, representing fonts as an SVG file. So, if I could convert a font to SVG then in theory I could glitch it!
First I needed a font to work with. The very popular Ubuntu font wasn’t out at that point and so I opted to use Liberation Sans. It’s a free font and had a lot of glyphs.
Using FontForge I converted the font to an SVG font (File > Generate Fonts). I then used the glitch script from Garry Bulmer in a way like so:
#!/bin/bash

no=1

while [ $no -le 1001 ]

do

echo $no

./glitch 0.1 < font.svg > font.svg

cp font dataface_$no.svg

no=`expr $no + 1`

done
Then I had a folder of 1002 SVG fonts. I needed to turn them back to ttf files and so used the follwing font forge scrpt to convert them back to ttfs
#!/usr/local/bin/fontforge

Open($1)

Generate($1:r + ".ttf")
And ran it over the whole folder with this cript
#!/bin/bash

no=1

while [ $no -le 1001 ]

do

echo $no

fontforge -script convert_font_fontforge.pe dataface_$no.svg

no=`expr $no + 1`

done
Finally, I generated the frames used for the video by creating an SVG file with the text in that uses the Liberation Sans font. For each frame I swapped the font file with the next one which was a bit glitchier:
#!/bin/sh

no=1

while [ $no -le 1001 ]

do

echo $no

sudo rm /home/hellocatfood/.fonts/*.ttf

cp /home/hellocatfood/Desktop/dataface_$no.ttf /home/hellocatfood/.fonts/

convert /home/hellocatfood/Desktop/glitch.svg /home/hellocatfood/Desktop/glitch_$no.jpg

no=`expr $no + 1`

done
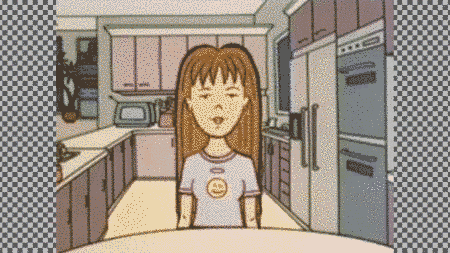
ta da! Not a very elegant soluion but it was 2010. And it worked! The result you already saw at the beginning of this blog post. So, to make a HD version of it, in theory all I need to do was create an SVG file that was 16:9/1920×1080 and repeat this process. Here’s the result of that process:
Yikes! Not at all like the original.
You may be asking why I don’t just convert the text to paths (Ctrl + Shift + C in Inkscape). That would do away with the need to generate 1002 font files. Here’s what that would have looked like:
However, it differs from the original in one unique way. Once the glitches start there’s a lot of random question marks that appear and float down he screen. I don’t know why this happen but I suspect that Imagemagick doesn’t know how to interpret the glitched glyphs and so produces and error.
There are also some frames which fail to render the font at all and in a couple of instances render a serif font!
The results in the original are not consistent, but the piece is an exploration of glitches and so whatever glitch was produced is whatever glitch I used. So there.
Therefore, any remake which didn’t look like the original wouldn’t be faithful to the original, and I simply didn’t want to exhibit a compromised video.
One promising solution which – TL;DR – didn’t work was to try and replicate the environment I made the original work in. That is, to try and replicate an Ubuntu computer from 2010. I booted up Ubuntu 10.10 on a virtual machine (using Virtual Box) and got to work.
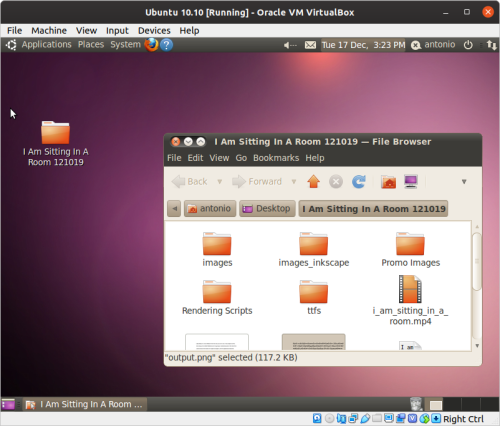
Ubuntu 10.10
Imagemagick was failing to read the font files and so I used GIMP on the command line to read and convert the SVG to pngs.
gimp -n -i -b - <<EOF

(let* ( (file's (cadr (file-glob "sitting_in_a_room.svg" 1))) (filename "") (image 0) (layer 0) )

(while (pair? file's)

(set! image (car (gimp-file-load RUN-NONINTERACTIVE (car file's) (car file's))))

(set! layer (car (gimp-image-merge-visible-layers image CLIP-TO-IMAGE)))

(set! filename (string-append (substring (car file's) 0 (- (string-length (car file's)) 4)) ".png"))

(gimp-file-save RUN-NONINTERACTIVE image layer filename filename)

(gimp-image-delete image)

(set! file's (cdr file's))

)

(gimp-quit 0)

)

EOF
cp sitting_in_a_room.png images/glitch_$no.png
Which produced this result:
This method shows error characters but not the same question mark error characters that were in the original. No matter what I tried it just wasn’t working.
So, in the end unfortunately I admitted defeat and exhibited the original 4:3 video. It would be easy to blame the 2010 version of myself for not creating an air-gapped iso of Ubuntu or for not properly documenting my processes, but how was I to know that I would be revisiting the piece 10 years later! Heck, in 2010 HD resolution was still not widespread, so I was really just working with what I knew.
And really, this highlights the volatility of glitches.