
In 2020 I did quite a number of workshops in using the Improviz visuals live coding environment. Improviz can be thought of as a fork of Livecodelab, especially as its developer, Guy John, is one the developers of Livecodelab. However, it has some key differences that make it stand out as its own unique software:
- It works on the desktop, and I think it is faster because of it
- The language is more fully documented
- You can load your own textures, gifs, 3D models, and shaders
Being able to load your own textures might in itself be a reason for many people to switch from Livecodelab to Improviz. Things can be that just a bit more personalised when you’re using your own images and objects rather than only colours, gradients and basic geometrical shapes. Another potentially useful difference is that in Improviz you can interface with the software using Open Sound Control (OSC). This opens up the possibility of using software or external hardware devices. In this blog post I’ll take you through how you can connect a midi controller to Improviz via OSC and Pure Data.
To get started you first need to define a variable in Improviz that you want to be changed by OSC/midi. The name of this variable can be anything as long as it’s not a name already used as a function or variable in Improviz. Check the reference page for a list of reserved names. In my example I’ve used the variable name size.
size = ext(:size, 1)
Next, we need to connect to it via osc so that we can change its value.
When you launch Improviz via the terminal one of the messages you’ll see printed is the port it is using for sending message over OSC.
2021-03-25 20:53:.732595  INFO: Running at 640 by 480
2021-03-25 20:53:.732733  INFO: Framebuffer 640 by 480
2021-03-25 20:53:.390032  INFO: Loaded 3 texture files
2021-03-25 20:53:.437047  INFO: Loaded 8 material files
2021-03-25 20:53:.441641  INFO: Loaded 5 geometry files
2021-03-25 20:53:.441718  INFO: *****************************
2021-03-25 20:53:.441766  INFO: Creating Improviz Environment
2021-03-25 20:53:.466755  INFO: Loading ./stdlib/variables.pz
2021-03-25 20:53:.466846  INFO: Loading ./stdlib/transformations.pz
2021-03-25 20:53:.466890  INFO: Loading ./stdlib/shapes.pz
2021-03-25 20:53:.466930  INFO: Loading ./stdlib/style.pz
2021-03-25 20:53:.466968  INFO: Loading ./stdlib/textures.pz
2021-03-25 20:53:.467004  INFO: Loading ./stdlib/screen.pz
2021-03-25 20:53:.467039  INFO: Loading ./usercode/grid.pz
2021-03-25 20:53:.467078  INFO: Loading ./usercode/seq.pz
2021-03-25 20:53:.467116  INFO: Improviz OSC server listening on port 5510
2021-03-25 20:53:.467297  INFO: Improviz HTTP server listening on port 3000
2021-03-25 20:53:.467405  INFO: Improviz resolution: 640 by 480
Of course you can, at this stage, use any software that can send data over OSC, but for this blog post/tutorial I’ll be using Pure Data. Alternatives exist but I like using it as it’s lightweight, stable and is cross platform.
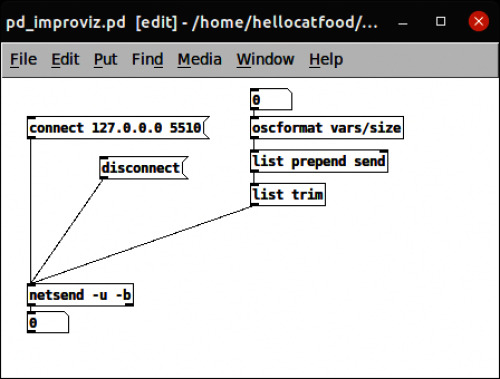
To send OSC messages use the [netsend] object to connect to the same ip address as Improviz (usually 127.0.0.0) and same port (5510). [udpsend] will output a 1 from its only outlet to show a successful connection. With the connection established I can now send values from a number box to the variable via OSC!
Right now I’m using number box which has its values being set by me manually clicking and dragging. I could have the numbers being generated randomly by using the [random] object, or even have some level of audio reactivity by using the [adc] object. If that’s your thing you do it! Keeping to this blog post’s title I’ll be using a midi controller to change these values. For this next stage you should know that I’m using Ubuntu (20.10) as my operating system. This means that the instructions, especially those concerning connecting a midi controller, may be different for your operating system. Sadly I can’t help with that.
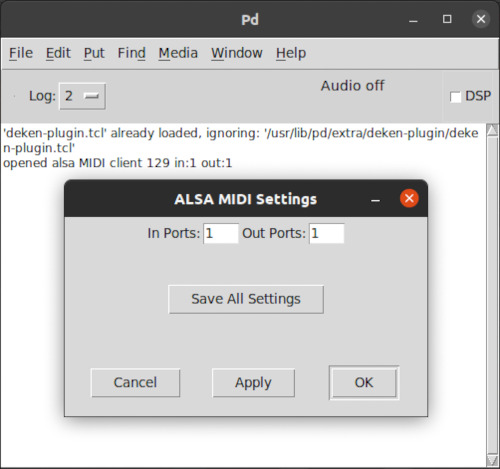
Connecting a midi controller to Pure Data is quite easy. I’m using an Akai MPK Mini MKII, but the instructions on connecting the controller are the same for pretty much any midi controller. First make sure that Pure Data is exposing at least one midi port. Change your midi backend to ALSA-MIDI in Media > ALSA-MIDI. Then go to Media > MIDI Settings… and make sure you have at least one midi input.
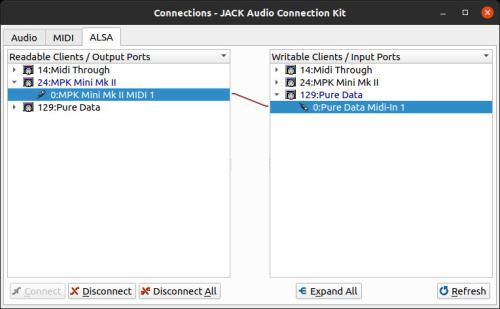
Then, open QjackCtl, click on the Connect button and under the ALSA tab connect the MPK Mini Mk II output port to the input port of Pure Data.
In Pure Data you can now read the Control Change (CC) values of a one of the knobs or pads using the [ctlin] object. On my MPK the first dial (K1) is [ctlin 1]. It outputs values from 0 – 127 (128 values). I want it to change the size of a cube from 0 – 4, so I need to map the ranges. I found this very handy mapping abstraction so I’ll be using that. With the ranges mapped I can use the knob on my controller to change the size!
Pure Data patch in Improviz code is here: pd_improviz_4.zip
For my next trick I want one octave, C5 to G5, to alter the shades of grey of the cube. The [notein] object will tell me the current midi number of the key being pressed. From that I can deduce that C5 to G5 is midi notes 48 – 59. Using the [maxlib/scale] object again I can map those ranges to 0 – 256 and send those values over OSC to a variable in Improviz that will be used to change the fill function.
Pure Data patch in Improviz code is here: pd_improviz_5.zip
For my final form I’ll use one of the pads on the midi controller to toggle a random colour generator.
Pure Data patch in Improviz code is here: pd_improviz_6.zip
One of the possibilities of using a midi controller to control visuals in this way is that you can control the audio and visuals simultaneously, rather than one being triggered in reaction to the other. In my experience of doing live visuals it has been quite normal for visuals to move or, as is quite often the case, pulsate in reaction to the amplitude of the music. In fact I did this many years ago for a video for My Panda Shall Fly.

What I’ve sometimes noticed is that there’s latency and the reactive visuals often feel like they’re coming in too late after the beat/instrument has hit. Of course the latency can be reduced by adjusting the sensitivity of the audio input device (microphone or line in) but then it’s a fine balancing act of both the musician and visualist adjusting levels. Achievable but a pain!
By having one device/controller triggering both you can, in theory, have both happen simultaneously. Here’s a demonstration of this from October 2020
As you can see the midi controller is controlling both the visuals and the audio. When I eventually get back to performing live gigs this is definitely something I’m going to explore further. Until then, have fun mixing live coding with midi controllers!