Glitch GIMP

On Wednesday 29th April I gave my Allowing Mistakes to Happen presentation at Libre Graphics Meeting in Toronto. I was quite anxious about this because the attendees are, typically, developers of software and/or graphic designers. Looking through the archives I found only a comparatively small amount of presentations from artists talking about their artwork and even fewer from those you might call experimental artists (glitch art, generative art etc).

My fears were put to rest somewhat once my presentation actually happened. Despite my computer crashing towards the end (glitch lol) it seems to have struck a chord with many of the attendees. It seemed that they liked that I was turning bugs and the bug hunting process into a form of art.

One such person that was inspired was Michael Natterer, aka Mitch, one of the developers for GIMP, the premier open source photo and image editing software. He showed me how by changing one option when compiling Cairo the contents of the image window would be glitched.

Glitch GIMP

Of course I was quite impressed by the prospect of having a full-featured editing program that could produce only glitch art, so quickly sought advice on compiling it for myself. Presented below are instructions for creating your own glitched GIMP.

Before we go on

This compilation process and the resulting binary file has only been tested on Ubuntu 15.04. I have no way of knowing if the same will work on Windows, Mac OSX or any other flavour of Linux. Also, this tutorial assumes that you have some knowledge of compiling software. If this is all daunting to you go do some research.

…and now we begin

To avoid conflicts we’re going to compile and install Glitch GIMP to its own directory, leaving the original GIMP unmodified.

First create build and installation directories.

mkdir build
mkdir install
mkdir install/share/
mkdir install/share/aclocal

In the build directory you’ll need to create a file which will hold our environment variables.

cd build
touch env.sh

These environment variables will tell the computer where to install GIMP. A word of caution, these environment variables are valid for the current session. In other words, if you close your terminal window you’ll have to load these in again. Fill you env.sh file with the following, changing the first line to point to your install directory.

PREFIX=/~
export PATH=$PREFIX/bin:$PATH
export LD_LIBRARY_PATH=$PREFIX/lib:$LD_LIBRARY_PATH
export XDG_DATA_DIRS=$PREFIX/share:$XDG_DATA_DIRS
export GIO_EXTRA_MODULES=/usr/lib/x86_64-linux-gnu/gio/modules
export ACLOCAL_FLAGS="-I $PREFIX/share/aclocal"
export PKG_CONFIG_PATH=$PREFIX/lib/pkgconfig:$PKG_CONFIG_PATH
export CPPFLAGS=-I$PREFIX/include
export LDFLAGS=-L$PREFIX/lib

Now fill your session with those variables.

. env.sh

Now we can begin compiling! You’ll have to install GIMP’s dependencies and an extra library.

sudo apt-get build-dep gimp
sudo apt-get install libexiv2-dev

Still in the build directory you’ll now have to clone parts necessary to compiling GIMP.

git clone git://git.gnome.org/babl
git clone git://git.gnome.org/gegl
git clone git://git.gnome.org/gexiv2
git clone git://git.gnome.org/gimp

And Cairo.

git clone git://git.cairographics.org/git/cairo

And now, compile and install babl and gegl:

./autogen.sh --prefix=/path/to/install/directory/
make -j4
make install

hint: if, like me, you have four processors you can run

make -j4

to speed up compiling.

In gexiv2 run:

./autogen.sh --prefix=/path/to/install/directory/
make -j4
make install

In the cairo directory run

./autogen.sh --prefix=/path/to/install/directory/ --enable-xlib-xcb=yes
make -j4
make install

(this is the compile option that causes the glitches 😉 )

And finally, compile and install GIMP

./autogen.sh --prefix=/path/to/install/directory/
make -j4
make install

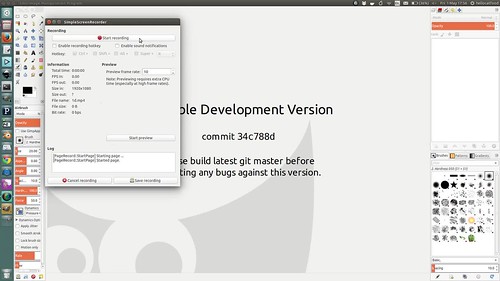
In your install/bin directory you should now have a file called gimp-2.9. Run this and let the glitch begin.

Glitch GIMP

Glitch GIMP

Glitch GIMP

Glitch GIMP

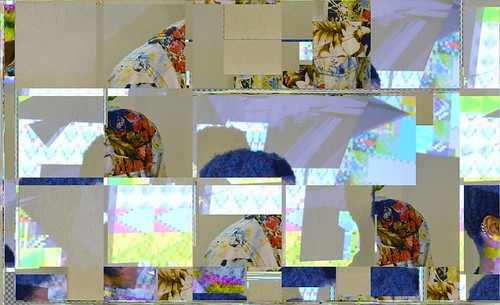
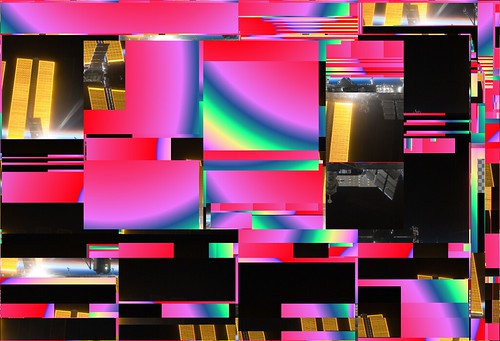
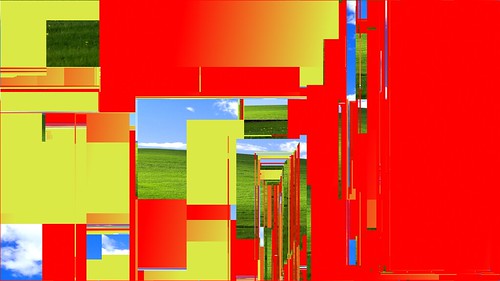
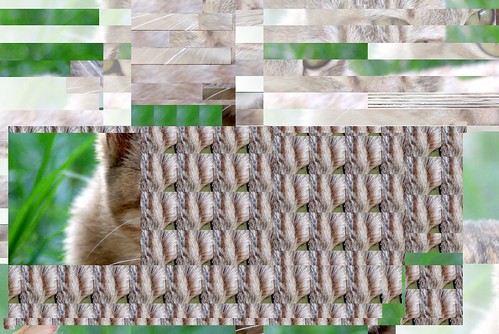
One thing you will instantly notice is that you can’t directly export the glitch output to a file. This is for display only and, like true glitches, can’t be easily replicated or captured. The only way to do this is to take a screenshot, which is ideal for on-screen display but not so great if you want print quality output.

I’ve been told that I could produce some more reliable glitches by creating or hacking GEGL plugins. I haven’t delved into this yet but if anyone wants to assist please do get in touch.

Thanks

I never would have gained this knowledge had I not been able to attend Libre Graphics Meeting. As seen in the forum thread describing how I came across the databending in Audacity method, trying to ask developers how to creatively break your software can be a confusing task. However, being able to show the developers IRL what can be produced allowed the flow of information to be smoother and more productive than an e-mail exchange would have been.

Libre Graphics Meeting will be coming to London in 2016 and the aim is for it to be free for all to attend, and to cover travel costs of speakers, as it has done every year. If you want to help more stuff like this happen donate now.

Non-Destructive Image Editing and Git

One of the hot topics at the Lbire Graphics Research Unit Co-Position meeting came from the Visual Versioning work session. The work session focused on creating mockups for ways to improve their Visual Culture Git Viewer.

OSP Visual Culture Git Viewer

This tool goes some way to addressing the issue of not being able to visualise the contents of a repository by providing thumbnails of the contents. One of the functions missing from this tool is the ability to compare and merge different versions images. Github already provides the ability to compare still images (.jpg .png etc) in various different ways:

Image view modes

However, this is only a way to compare the output of the program. How could revision tools work with PSD/XCF, SVG or SLA files that contain more information such as layers and tools used to complete tasks?

Non-Liner Version Control in GIMP

A team of researchers has attempted to address this problem, at least in GIMP. Their work demonstrates an extremely effective way of doing version control from within GIMP

The research surrounding this tool is available to view and hopefully it’ll one day be implemented into GIMP. Whilst this solution is very effective and address every problem mentioned so far, it creates another problem: It is tied to GIMP and is not easily transferable to other programs. Trying to apply this to other programs such as Scribus or Inkscape would require extra resources, which are in scarce supply. Essentially what is needed is a program-neutral solution that would require few additionaly resources to implement.

Ctrl+Z

Almost all modern programs allow you to undo your actions. When you look at this with more detail you begin to see that undo is a (highly unsafe) method of revision control. By using Ctrl + Z and Ctrl+Y/Ctrl+Shift+Z you can scroll through previous states of a file. All of the data surrounding your use of the program, such as what tools you have used, what files you have opened and possibly even the time each action was executed, are being recorded in the undo history. One solution proposed in the work session was to devise a way to capture and record this data. By doing so you could “play back” the file through each of its stages. Once you have this data you could then begin to build a standalone tool that operates in a similar way to the GIMP revision control tool

Edit Decision List

A very common way in which people implement their own version control system is to create numbered revisions of their files. For plain text files this presents few problems, but for binary files (PSD/XCF etc) it could mean that you have many large files which present a whole host of problems around bandwidth and storage space. Ana Carvalho and Ricardo Lafuente, who produce Libre Graphics Magazine with ginger coons, revealed that the repository for the magazine – including previous issues – has reached 8GB.

The solution proposed at the work session would address this issue as you would only need one copy of the original files that you work from. The “undo data” would be captured to a separate file that would then simply apply those actions to the file.

GEGL

GEGL, which is the new core powering future versions of GIMP is, to my knowledge, already working in a non-destructive way. Peter Sikking, the lead interaction and UI designer for GIMP, has more to say on this topic.

Blender node editor by Dykam

Users of Blender and other node-based compositors will already be familiar with this approach. Effects are chained together in a non-destructive and then sent to an output file. As Pete Sikking describes:

If the structure of [the] graph is written to a file—apart from the input images, all other boxes are just snippets of XML—and a year later it is re‑opened in GIMP, then each of the operations and their parameters; each of the vector shapes or text can be freely changed

If the time can also be recorded then you could essentially reconstruct an image using nothing but the input files and this XML file.

Next steps

Of course, at the moment, all of this is theory and ideas which, in some ways, was the purpose of the work session. For this to be taken further what needs to be done is to first find a way to expose the data that is saved in the undo states. If this data is useful then the next steps can begin. Then, if it looks like a viable solution, all that is needed is developers willing to take on the task.

Thanks…

My thanks go to Constant and its many partners for organising for Libre Graphics Research Unit and to those in the work session – Ana Carvalho, Eric Schrijver, Ale Rimoldi, Gijs de Heij, Thomas Laureyssens and Camille Bissuel – whose ideas this blog post contains, along with some of my own.

Examples

I was showing a friend some open source software for design and evenetally came to Alchemy. Within just 10 minutes of srcibbling and then doing a bit of post processing in GIMP 2.7 I had this:

Click to download the psd file. Made in GIMP 2.7

I like when accidents like this happen

Birthday Cake

After seeing my newly created twitter background, Jon (aka scribbleboy) asked me to do one for him. So I did. In fact, I did several versions

Birthday Cake (by hellocatfood)

Birthday Cake (by hellocatfood)

Birthday Cake (by hellocatfood)

He asked for something red, so I took a few birthday pictures and did the equivalent of putting them through a shredder!

It seems recently that there’s been a bit of a backlash against databending. Reading some of the threads/comments over at 8bitcollective.com suggests that people are getting tired of people posting everything that they’ve processed through Audacity without much though to its artistic content. I tend to agree, so I thought I’d do something more with the output of the bends in order to make these ones. I took them through GIMP and edited them a bit, made them seamless for tiling and changed the colours slightly.

Family Portrait

After seeing some of my recent work I was asked to do a family portrait. The last time I did a portrait on such a large scale was in 2007 in Adobe Illustrator and the last time I did a realistic portrait was probably back in 2006 of an old photographer buddy. I’ve been using Inkscape for just over a year now and whilst I’ve been doing little bits and pieces I haven’t actually done a major illustration.

As always I started with the outline first and filled it in with basic colours. I used GIMP and a very useful cutout filter to help me visualise how I was going to layer the colours and shapes that I needed. From there it was a simple case of refining and perfecting! Have a look at some of the progress shots:

1 2 3 4

The finished product looks like so and is probably my favourite piece this year:

The finished family portrait

The finished family portrait

The finished result was printed onto a canvas and is mounted on their wall. Yay!

If you’re that kinda person you can have a look at the wireframe of the image:

wireframe 1 wireframe 2 wireframe 3 wireframe 4

Overall working in Inkscape was quite easy in terms of drawing. One bit of praise I often hear about it is its drawing and node editing tools, and it really did feel quite easy to draw this. However, there are two areas where I feel Inkscape hindered my creativity in creating this piece.

The first is how it implements brushes. Inkscape does this by using the Pattern Along Path Live Path Effect, which in some instances can be more useful than Illustrator’s brush tools. What I feel some users want is for the pattern to act as the stroke of a path and to still be able to edit the fill of a path. This would’ve been very useful for me when drawing the hair.

The second is it’s lack of extensive layer blending modes. Currently Inkscape has five layer blend modes, which includes normal/no blend and these can only be implemented on layers, not individual objects. As far as I know you were able to set the blend mode for each paths in 0.44, but it was removed for technical reasons. I achieved the effects in my earlier work by, at times, combining over ten different blend modes on individual objects. Take a look at this walkthrough by popular vector artist verucasalt82 and you’ll see why it can be quite handy. So, in the absence of blend modes for individual paths could we see a few more blend modes, overlay in particular?

With all of that said, you can see that Inkscape is still a very capable program. I overcame many of the problems I described by just doing things a little different than usual.

Starting off Simple

I’ve been doing quite a bit of messing around with Alchemy. Whilst in search of solution for a problem in Blender I came across a rather awesome time-lapse digital painting from an upcoming Blender Foundation project, Durian. Not only was I blown away by the skill of the artist but also by the software that he uses. I’m an open source nut so was really glad to see him use GIMP and other open source software to produce his piece. One particular piece of software that stood out to me was Alchemy.

If you’ve watched the video already you’ll have seen how he used that program to create chaos from which to build something else from. I was a bit skeptical at first, thinking that GIMP and Inkscape can do this already and with many more options. However, upon using it I could soon see the benefits of using this program. As the website so clearly states, it’s not meant for finished pieces (although some have used it to create finished pieces). It’s meant to help generate ideas, to sketch, to just go crazy on!

After just a week of using it this was some of the work that I had created in it

Lunchtime Butterfly (by hellocatfood) Stop Hitting Yourself (by hellocatfood)

I soon began to think more about what I perceived to be the point of the program. Typically, when I sketch my marks start off very light and whispy. Then, I draw over these whispy lines with more confidence until the original marks either become thicker and darker or are simply overshadowed by the newer marks. With practice you would then expect one to be more confident with their mark making, to the point where there are no more whispy lines, just sharp, clear marks.

Also, after many hours of studying you would expect one to make marks that represent any form in as few marks as possible. One important lesson I learnt at university is that you should only add detail where it’s needed. Spending 100 hours on an art piece may be personally satisfying but when people wont notice or have the time to appreciate that amount of detail why bother. In another situation, when you have a deadline looming, do you really have the time to add insane amounts of detail?

In time I feel I should be using this program to help develop this skill and my confidence as an artist. Drawing intricate layered pieces may look impressive but personally I know part of the reason I use that style is lack of confidence. I have put a suggestion to the developers to add a feature to Alchemy (and I’m slowing learning Java) that can help facilitate this by restricting the amount of shapes you can have on screen, but until then I’ve been doing a few tests of my own. Partly born out of frustration I’ve been trying to do portraits of myself using as few shapes as possible, in this case four shapes. As there are soooo many different recognisable features about our own individual faces it would be quite a challenge to pick just four features or shapes.

Working from memory I drew these portraits last night.

Portrait 1 Portrait 2 Portrait 3 Portrait 4 Portrait 5

On a side note the good thing about Alchemy is that it can record a snapshot of your drawing to a pdf at timed intervals. You can download a zip of all of the pdfs if you really wanna see how I did it.

Admittedly the first portrait probably has six shapes (open the pdf up in Inkscape to find out) but that was because I accidentally used a white shape on a white background. Alchemy has no undo function so I just painted over it in black.

I slept on it and came back with a few new ideas. Do you really need to draw someone’s head or hair? That depends on what their most recognisable features are. I am quite well known for my hair, but I proved last year that even without it people still knew who I was *shock*. So, maybe it’s not that important. As a test for yourself, try taking a portrait picture of yourself. Open that picture up in your favourite picture editor (I use GIMP (duh)) and apply the photocopy (or equivalent) filter. If needed erase the background until you have just your facial features.

With Hair and clothes

With Hair and clothes

Without Hair and clothes

Without Hair and clothes

Is it still recognisable?

So, I tried again to draw myself using only four shapes, but this time only my facial features. Here are my results (same four-shape rule applies).

New Portrait 1 New Portrait 1
(download zip of pdfs)

A little more recognisable? Four shapes might be a little bit too restrictive but you only really learn from challenging yourself. Why not try making the cursor invisble when you draw (press H) or draw “blind” (Affect > Draw Blind). Going back to the aims of the program once you feel more comfortable using very few shapes let yourself go a little bit and maybe use 10 or twenty shapes. Here is my final piece, starting with simple shapes, then going over with more detail

Final Portrait
(download pdf)

Open Source

I’m going to be moving into exclusively using open source software to create artwork in the near future*. More on why once I get my head around some of the software.

*that is unless it’s completely necessary that I use a piece of commercial software e.g. GMIP doesn’t support CMYK, yet Photoshop does.

Open Source software in design

Seems like I’ve started a rather interesting discussion over at the Computer Arts Forum about the use of Open Source software in design.

I think that the general consensus is that Open Source software apps such as Inkscape, GIMP and Blender will never replace their industry standard counterparts because there’s nothing wrong with these products in the first place. FOSS packages such as Open Office and Firefox (and to a lesser extent Ubuntu) have only really gained popularity because their counterparts are kinda rubbish. Neither Microsoft Office or Internet Exploder are as standards compliant as their FOSS counterparts and, in relation to Microsoft Office, you can save a lot of money by using Open Office that, whilst it has its flaws, offers very similar functionality to Microsoft’s product at zero percent of the cost! Brilliant!

When I start planning workshops soon, I’m still going to plan them assuming that they don’t have the necessary software (not all schools have Photoshop-like software) so will offer the use of FOSS packages. I think education is where Open Source will find its place in terms of design. What do you all think?