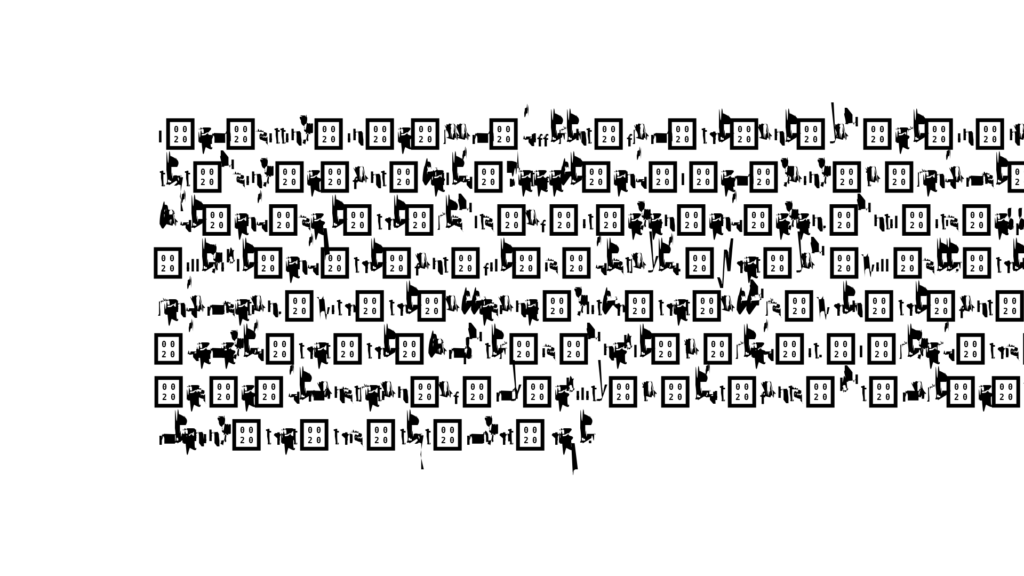
I Am Sitting in a Room Revisited

My remake of the Alvin Lucier artwork I Am Sitting in a Room was released 10 years ago today. To mark this occasion I want to revisit how I made it and troubles I had remaking it for 2019.

In November 2019 I Am Sitting in a Room was exhibited at Gamerz Festival in Aix-en-Provence in France. It was a pretty nice surprise to be invited to exhibit that piece, especially as it was made in 2010 and hasn’t been exhibited since aroudn 2015.

The festival’s organiser, Quentin, asked if I could remake the film in HD resolution, which is 1920×1080/16:9 aspect ratio. The original video was made in the very odd resolution of 1440×1152, which is 4:3 aspect ratio. In any normal situation using filmed footage, this could be an impossible task. If you wanted to convert 4:3 to 16:9 you’d either have to stretch the footage or crop it and lose information. See these examples below:
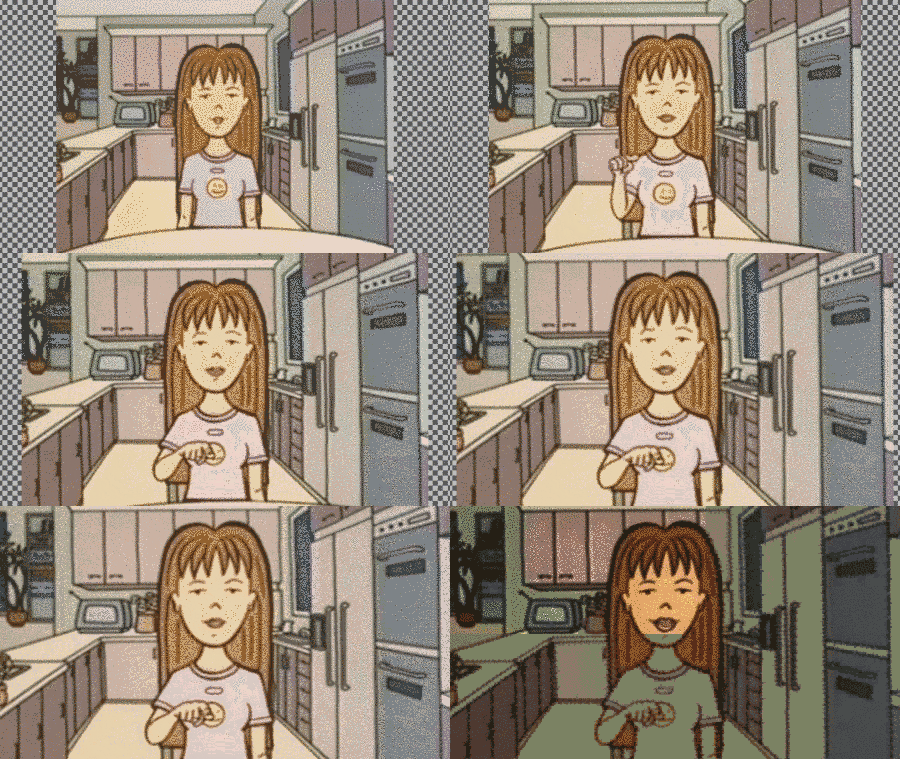
Crop to fit
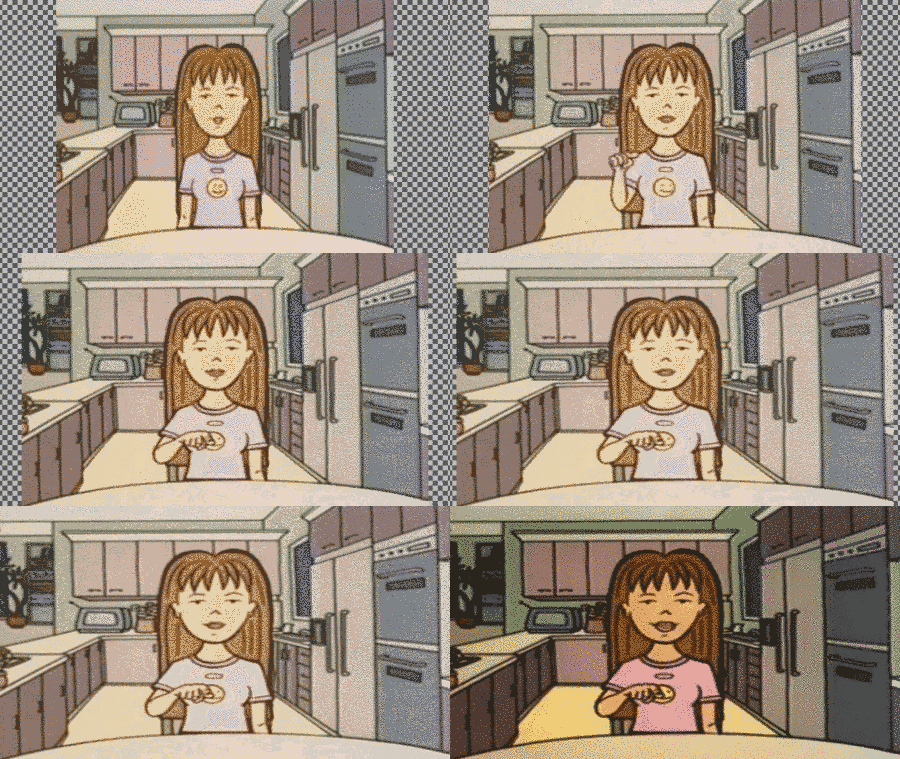
Stretch to fit

For I Am Sitting in a Room in theory this isn’t a problem as the piece is black text against a white background. So, I would just need to make the background larger and center the text.

Before going into the problems I faced remaking the piece in 16:9 it’s worth going over how it was made. Back in 2010 my programming skills were, to be blunt, crap. Making this piece required me to learn a lot about Linux, loops, automation and bash programming. Also back in 2010 I wasn’t that good at documenting my processes and so looking back at my source files some of them were not in a good state or were just missing. So, part of the following is pieced together from memory and what remains on my hard drives.

In 2009 I wrote about “glitching” SVG files and became really interested in that as a format to work with. Even today I like working with SVGs as they’re highly editable and can be used in many ways (vinyl cutting, plotting, laser printing, screen printing, web design etc).

If you’ve ever done any glitching via the command line you’ll know that you can utilise sed to automate the glitching of files. sed didn’t quite work on SVGs as it would always destroy them and so I asked Garry Bulmer to write a script to glitch SVG files. It worked great and left the SVGs in an editable state.

At some point later it was brought to my attention that font glyphs are formed in the same way as vector files in that the glyphs are made up of paths and nodes, hence why they are infinitely scalable. SVG fonts was/is a specification for, well, representing fonts as an SVG file. So, if I could convert a font to SVG then in theory I could glitch it!

First I needed a font to work with. The very popular Ubuntu font wasn’t out at that point and so I opted to use Liberation Sans. It’s a free font and had a lot of glyphs.

Using FontForge I converted the font to an SVG font (File > Generate Fonts). I then used the glitch script from Garry Bulmer in a way like so:

#!/bin/bash
no=1
while [ $no -le 1001 ]
do
echo $no
./glitch 0.1 < font.svg > font.svg
cp font dataface_$no.svg
no=`expr $no + 1`
done

Then I had a folder of 1002 SVG fonts. I needed to turn them back to ttf files and so used the follwing font forge scrpt to convert them back to ttfs

#!/usr/local/bin/fontforge
Open($1)
Generate($1:r + ".ttf")

And ran it over the whole folder with this cript

#!/bin/bash
no=1
while [ $no -le 1001 ]
do
echo $no
fontforge -script convert_font_fontforge.pe dataface_$no.svg
no=`expr $no + 1`
done

Finally, I generated the frames used for the video by creating an SVG file with the text in that uses the Liberation Sans font. For each frame I swapped the font file with the next one which was a bit glitchier:

#!/bin/sh
no=1
while [ $no -le 1001 ]
do
echo $no
sudo rm /home/hellocatfood/.fonts/*.ttf
cp /home/hellocatfood/Desktop/dataface_$no.ttf /home/hellocatfood/.fonts/
convert /home/hellocatfood/Desktop/glitch.svg /home/hellocatfood/Desktop/glitch_$no.jpg
no=`expr $no + 1`
done

ta da! Not a very elegant soluion but it was 2010. And it worked! The result you already saw at the beginning of this blog post. So, to make a HD version of it, in theory all I need to do was create an SVG file that was 16:9/1920×1080 and repeat this process. Here’s the result of that process:

Yikes! Not at all like the original.

You may be asking why I don’t just convert the text to paths (Ctrl + Shift + C in Inkscape). That would do away with the need to generate 1002 font files. Here’s what that would have looked like:

However, it differs from the original in one unique way. Once the glitches start there’s a lot of random question marks that appear and float down he screen. I don’t know why this happen but I suspect that Imagemagick doesn’t know how to interpret the glitched glyphs and so produces and error.

There are also some frames which fail to render the font at all and in a couple of instances render a serif font!

The results in the original are not consistent, but the piece is an exploration of glitches and so whatever glitch was produced is whatever glitch I used. So there.

Therefore, any remake which didn’t look like the original wouldn’t be faithful to the original, and I simply didn’t want to exhibit a compromised video.

One promising solution which – TL;DR – didn’t work was to try and replicate the environment I made the original work in. That is, to try and replicate an Ubuntu computer from 2010. I booted up Ubuntu 10.10 on a virtual machine (using Virtual Box) and got to work.
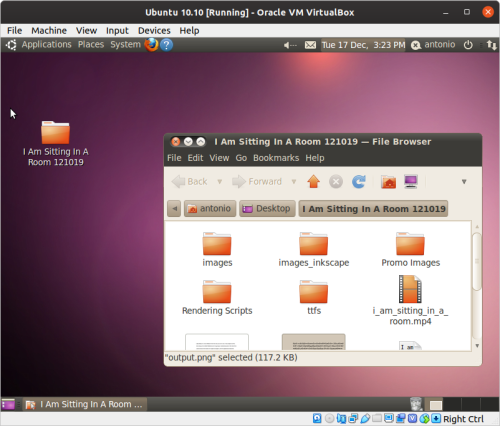
Ubuntu 10.10

Imagemagick was failing to read the font files and so I used GIMP on the command line to read and convert the SVG to pngs.

gimp -n -i -b - <<EOF
(let* ( (file's (cadr (file-glob "sitting_in_a_room.svg" 1))) (filename "") (image 0) (layer 0) )
(while (pair? file's)
(set! image (car (gimp-file-load RUN-NONINTERACTIVE (car file's) (car file's))))
(set! layer (car (gimp-image-merge-visible-layers image CLIP-TO-IMAGE)))
(set! filename (string-append (substring (car file's) 0 (- (string-length (car file's)) 4)) ".png"))
(gimp-file-save RUN-NONINTERACTIVE image layer filename filename)
(gimp-image-delete image)
(set! file's (cdr file's))
)
(gimp-quit 0)
)
EOF

cp sitting_in_a_room.png images/glitch_$no.png

Which produced this result:

This method shows error characters but not the same question mark error characters that were in the original. No matter what I tried it just wasn’t working.

So, in the end unfortunately I admitted defeat and exhibited the original 4:3 video. It would be easy to blame the 2010 version of myself for not creating an air-gapped iso of Ubuntu or for not properly documenting my processes, but how was I to know that I would be revisiting the piece 10 years later! Heck, in 2010 HD resolution was still not widespread, so I was really just working with what I knew.

And really, this highlights the volatility of glitches.

Seamlessly loop Wave Modifier in Blender

Seamless animation

For the Improviz gifs one of the requirements that Rumblesan set is that the gifs loop seamlessly. That is, one would not be able to tell where the gifs beings and ends. In Blender making an animation seamless is pretty easy. There’s lots of examples out there but for completion here’s my simple take on it.

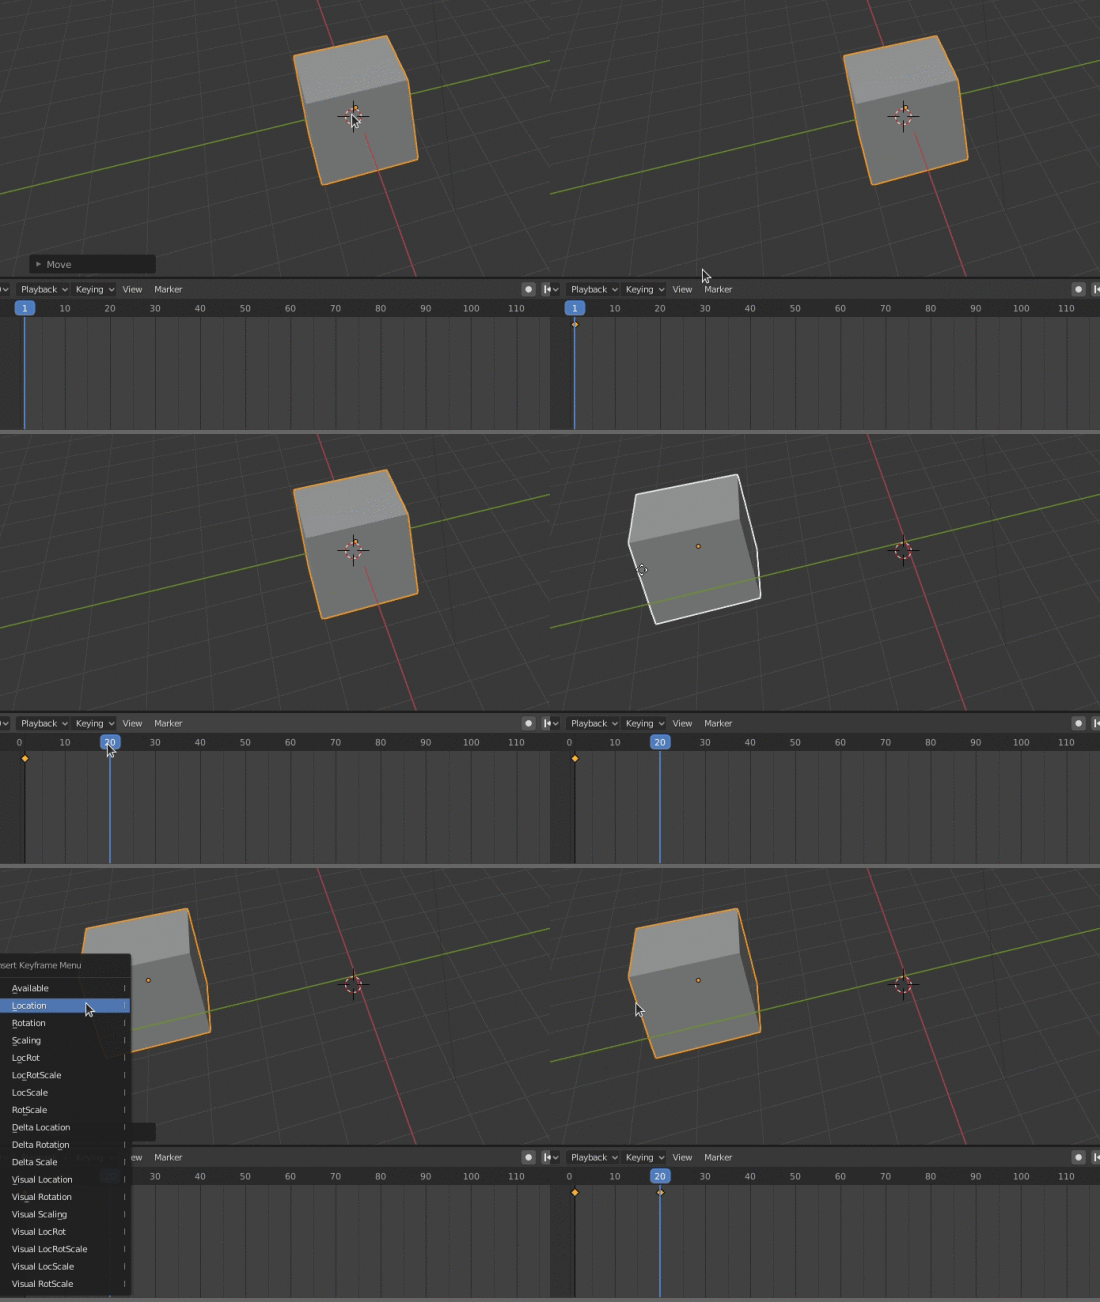
With the default cube selected press I and then press on Location. This inserts a keyframe for the location (this menu can also be accessed in Object > Animation > Insert Keyframe). On the Timeline at the bottom move the animation 20 frames. Then, move the cube to somewhere else.

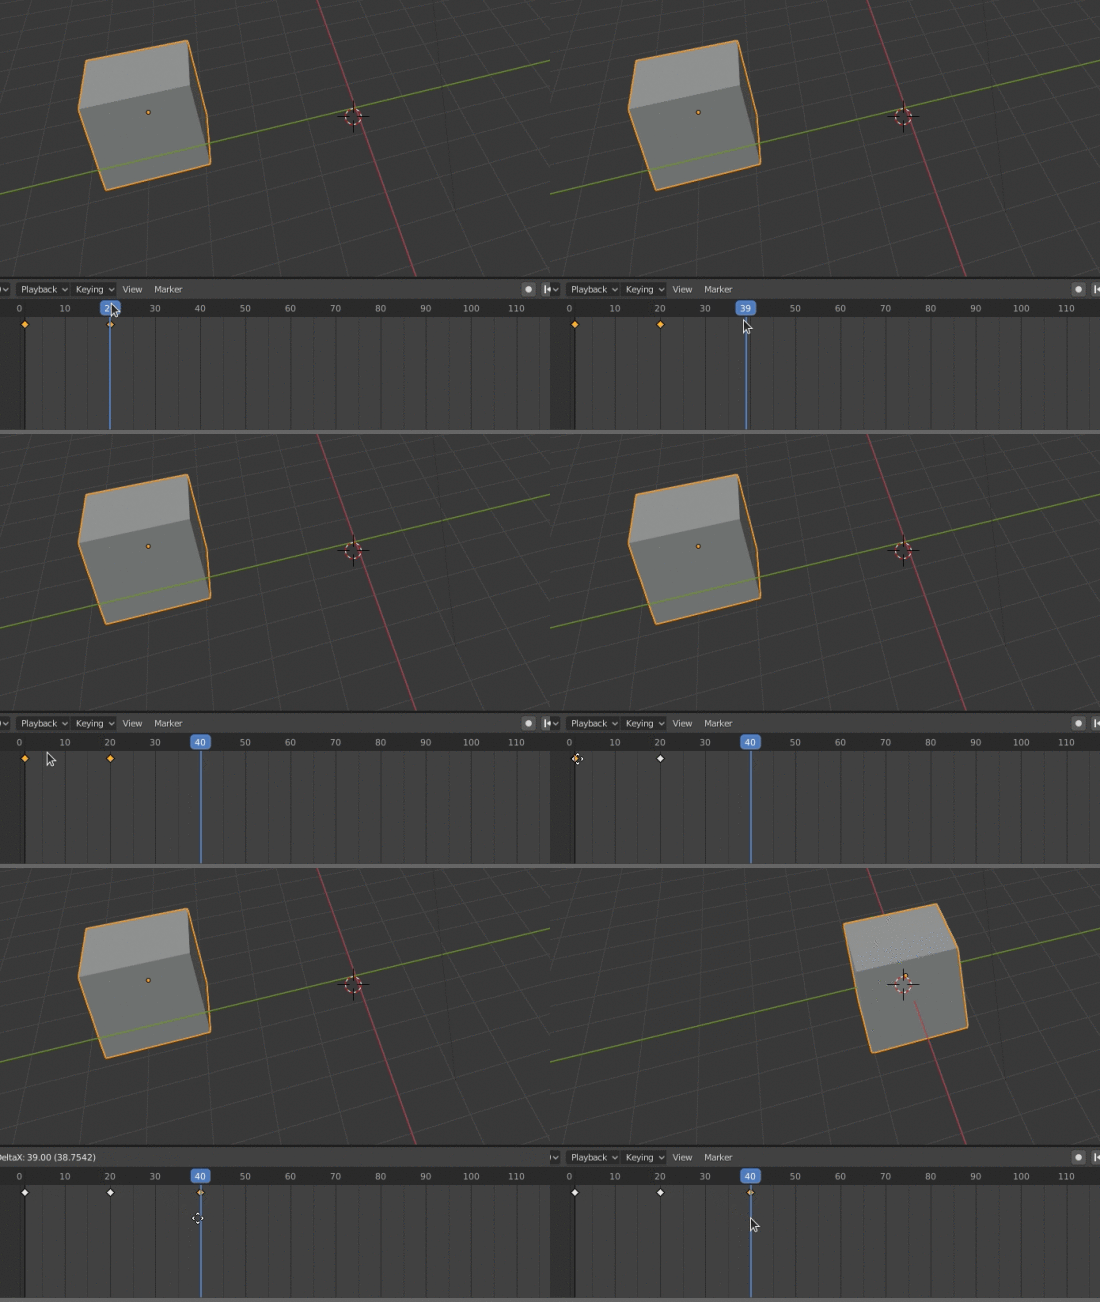
Now press I to insert a keyframe for the location. Ta da! You now have an animation! To make it loop we need to repeat the first keyframe. On the Timeline go forward another 20 frames (so you’re now on frame 40). In the Timeline select the first keyframe. Press Shift + D to duplicate it and then move it to frame 40.

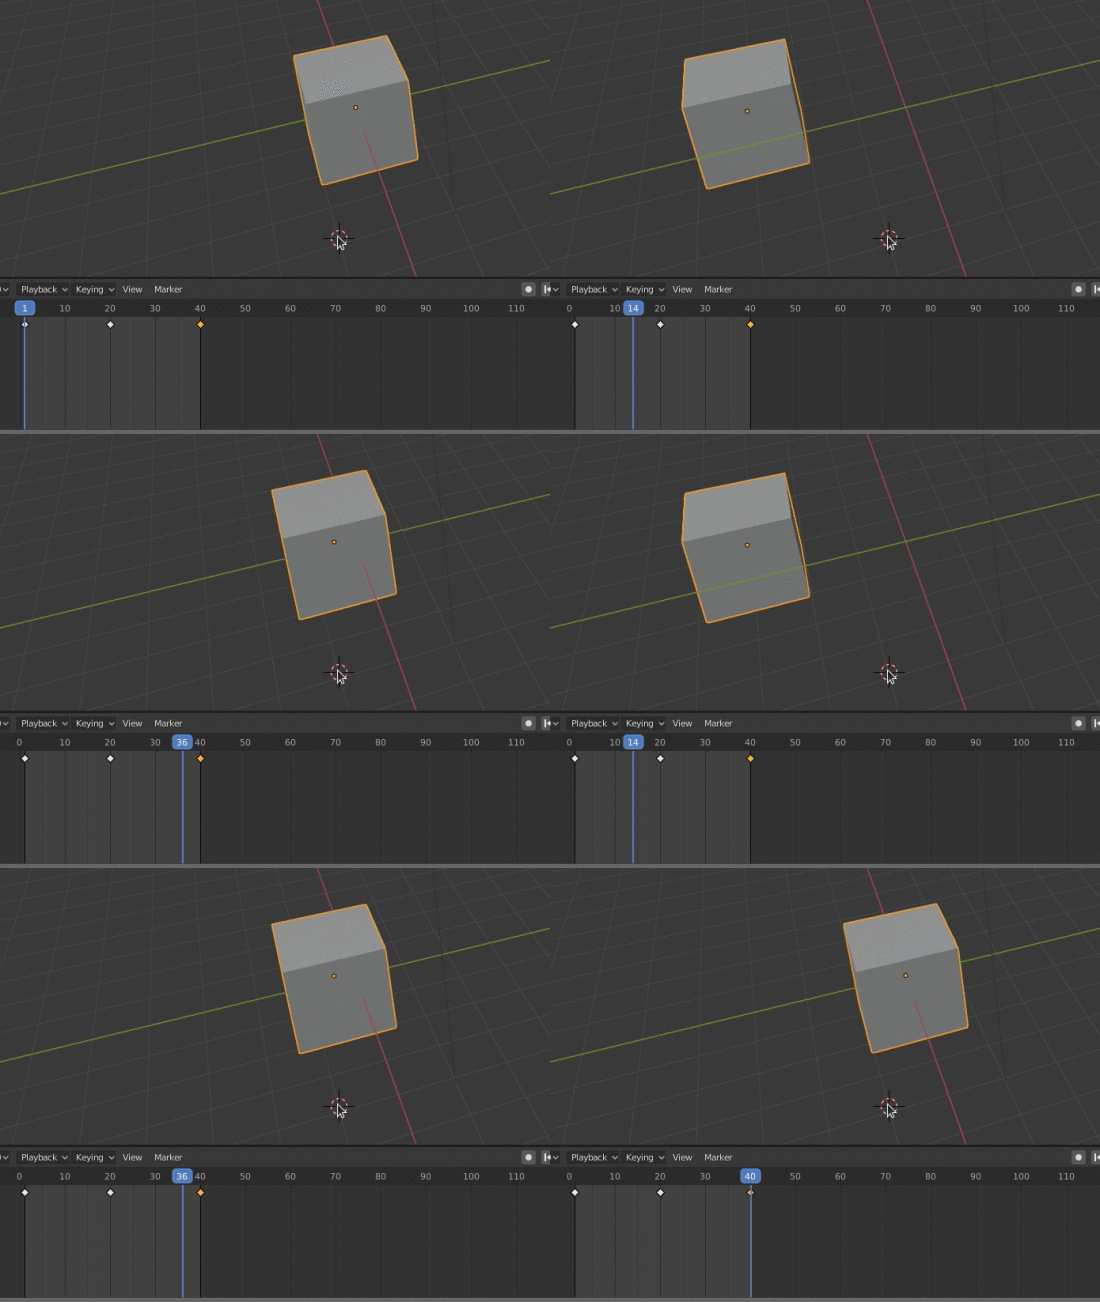
Set the end of your animation to be frame 40. Now when you press play (space bar) the animation loops seamlessly!

As an aside if you’re interested in animation check out Eadweard Muybridge. And if you’re into Pure Data check out this tutorial I made in 2017.

Seamlessly loop Wave Modifier

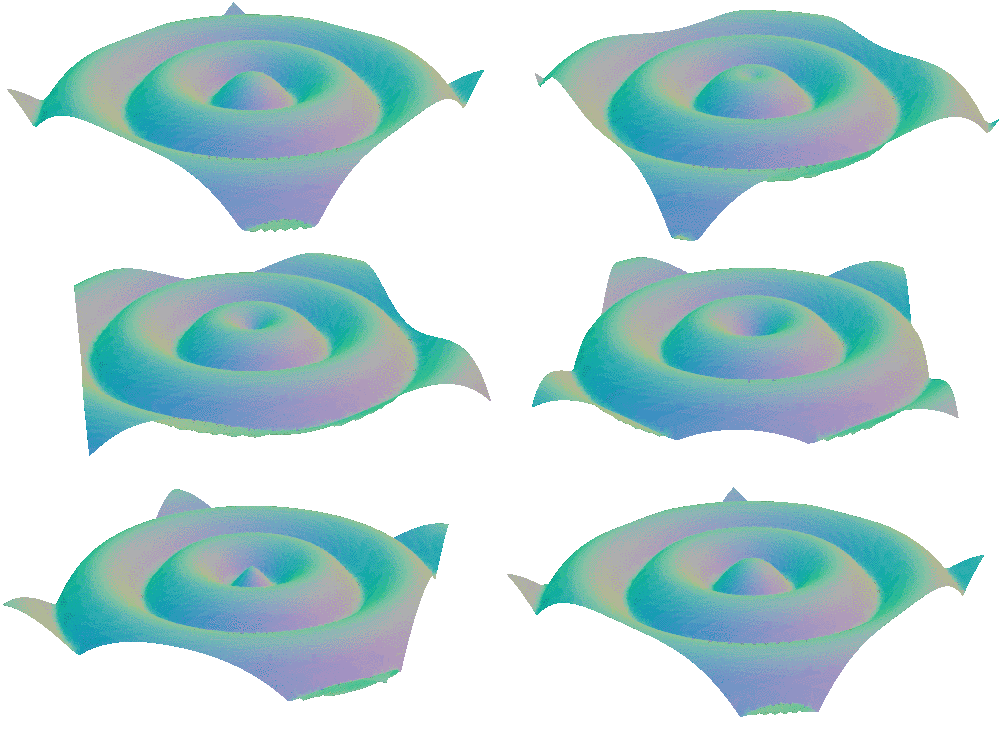
So, that’s one easy way to make a seamless looping animation. However, Rumblesan was more interested in are gifs that warp and morph. This is one example he sent me.

via GIPHY

In Blender one really useful modifier for making these animations is the Wave modifier. In fact, looking through all of the gifs in 2020 by that artist (Vince McKelvie) it looks like he makes extensive use of this modifier. I love how simple it is to get distorted objects without much effort.

The one thing I’ve always found difficult is making the looping of the waves seamless. I haven’t seen many tutorials on achieving this, and those that I have found rely a bit on guesswork, which isn’t ideal. So, I set out to understand this modifier. After a lot of trial and error and “maths” I finally consulted the documentation and started to figure it out! The documentation on this modifier is quite good but here’s my alternative explanation which may help those who think in a similar way to me.

To get your wave lasting a specific duration, first you need to know how long you want your animation to last. For this example I set mine to 50 frames.

You then need to decide on the Width of the waves. The smaller the number the more ripples you’ll have on your object. This value is relative to the object. So, if you set it to 0.10 you’ll have 10 ripples through your object. If you set it to 1 you’ll have one ripple. I’ve set mine to 0.25.

For the Speed you need to do a bit of maths. Copy the value of Width (0.25) and in the Speed argument enter: (0.25*2)/50. Replace 0.25 with whatever value you set for Width and 50 with however long your wave animation lasts before it loops. Another way to represent this would be:

Speed = ($width*2)/$animationlength

The animation loops however the waves don’t affect the whole object. This is because we need to add a negative offset so that the wave starts before the animation is visible. This is where we need more maths! Enter this into the Offset value:

((1/0.25)*50)*-1

The first part, 1/025, is to work out how many times we’d need to repeat the Width before the whole object has ripples throughout it. We multiply by 50 as that is the animation duration. Then, we multiply by -1 to get the inverse, which because the offset. Another way to represent this would be:

Offset = ((1/$width)*$animationlength)*-1

And now the whole object has waves through it and loops seamlessly!

Ta da!

Since I originally made the gifs I have found that there are alternative methods for achieving a wavy object which rely on the displacement node and Displacement modifier or the Lattice or Cast modifier. These solutions have much more documentation but I’m glad I spent the time figuring out the Wave modifier.

Overlaying multiple textures in Blender

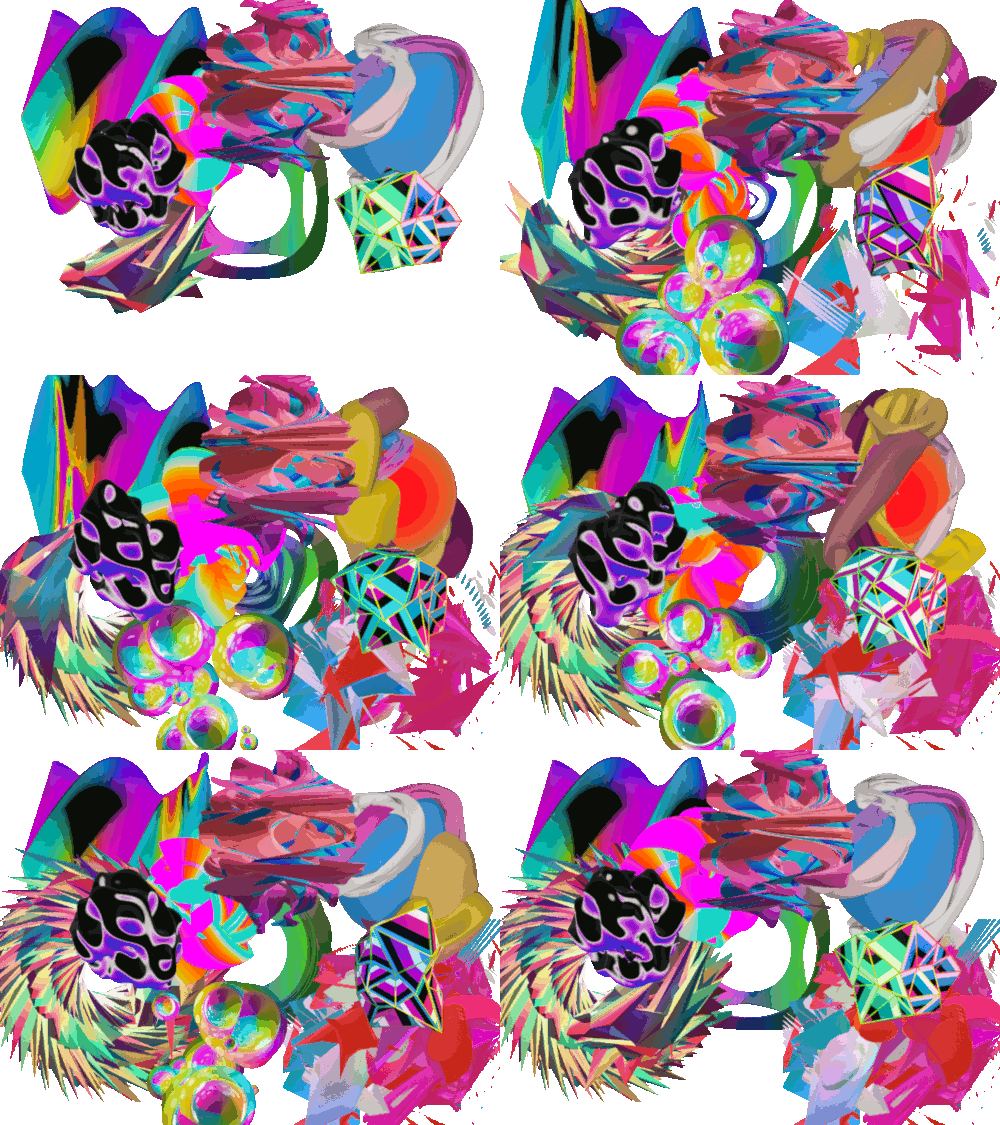
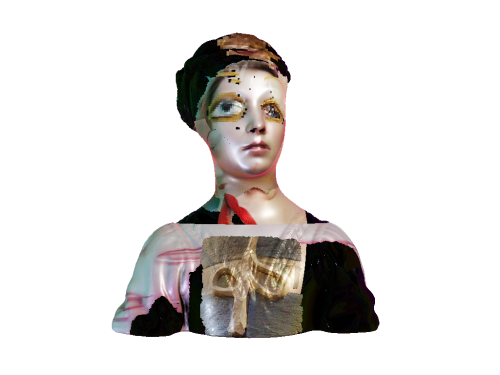
In 2019 I made an internet artwork for Fermynwood’s programme Toggler.

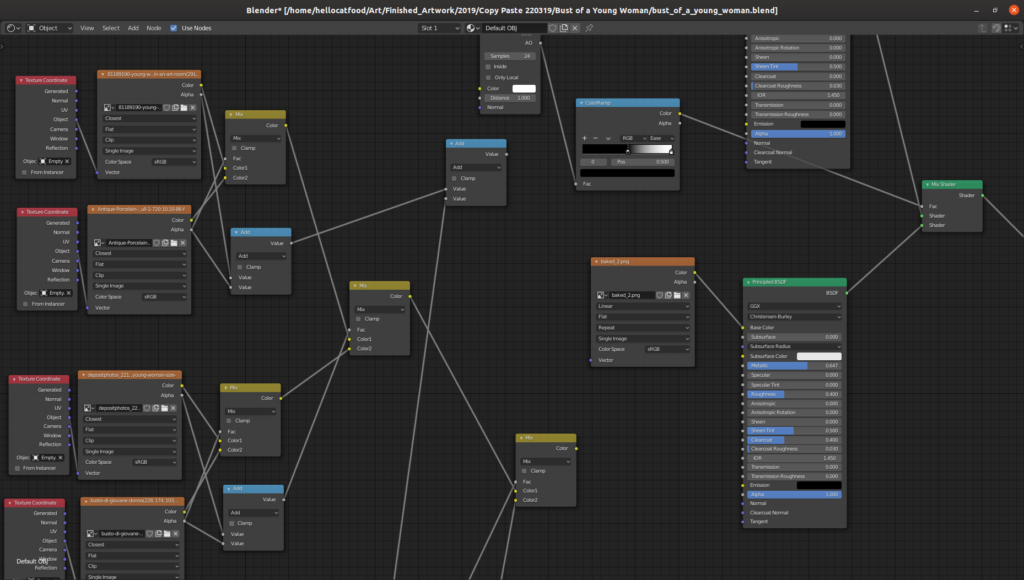
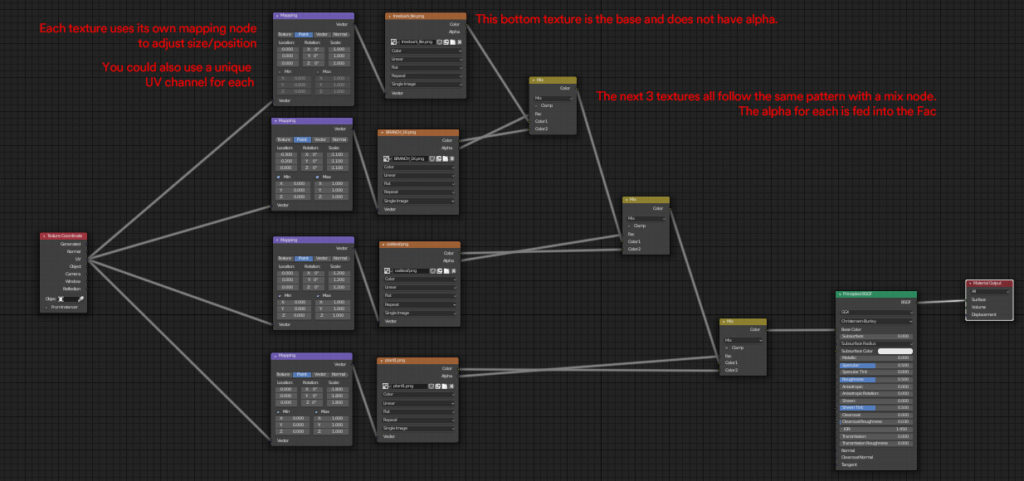
For this work I decided to use a similar aesthetic and process to Visually Similar. I talked a little bit about the process behind Visually Similar in a June’s Development Update. The node tree to overlay each of the transparent textures looked a bit like this.

Click to embiggen

When trying to do the same with the Toggler artwork I came across something weird that meant some textures just weren’t showing. So I decided to ask on Stack Exchange and Reddit why this might be the case.

Click to embiggen

It looks like I wasn’t using the alpha channels properly and didn’t need to use the Add math node, or just needed to use it properly. If were to apply the same process retrospectively to Visually Similar the artwork would look like this.

Curiously several of the textures didn’t show up. I suspect that doing it this “proper” way revealed that I had the order of the nodes incorrect. If I show the work again I’m might edit it so it looks “right”, but in this case the mistakes yielded a more preferable result.

Installing Bcc: at Vivid Projects part 3

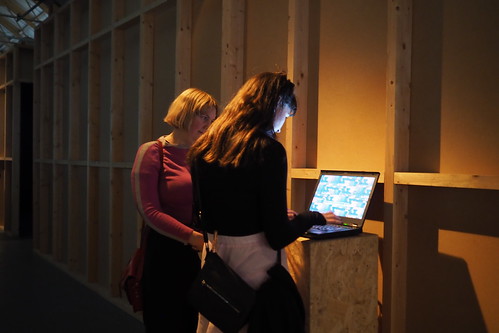
In this final part of this three-part series I’ll be going over installing Xuan Ye‘s work in the Bcc exhibition. This work posed a similar challenge to Scott Benesiinaabandan’s work. I needed to automatically load a web page except this time I needed to allow for user interaction via the mouse and keyboard.

The artwork isn’t online so I’ll again go over the basic premise. A web page is loaded that features a tiled graphic with faded captcha text on top of it. The user is asked to input the text and upon doing so is presented with a new tiled background image and new captcha. This process is repeated until the user decides to stop.

Bcc:

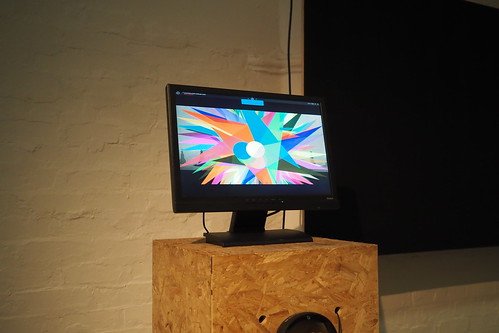
I could have installed this artwork on a Raspberry Pi but thankfully I had access to a spare Leneovo ThinkPad T420 laptop, which negated the need for me to buy a keyboard and screen (#win). The laptop is a refurbished model from 2011 and was running Windows 7 when I got it. It is possibly powerful enough to handle a full installation of Ubuntu but I didn’t want to risk it running slowly so instead I installed Lubuntu, which is basically a lightweight version of Ubuntu.

As I had installed Scott’s work I already knew how to automate the loading of a webpage and how to reopen it should it be closed. The main problem was how to restrict the user and keep the user from deviating from the artwork. Figuring this out became a cat and mouse game and was never 100% solved.

Whilst in kiosk mode in Chromium pretty much all of the keyboard shortcuts can be used. This means that a moderately tech-savvy user could press Ctrl + T to open a new tab, Ctrl + O to open a file, Ctrl + W close the browser tab, Alt + F4/Ctrl + Q to quit the browser or basically any other shortcut to deviate from the artwork. Not ideal!

Bcc:

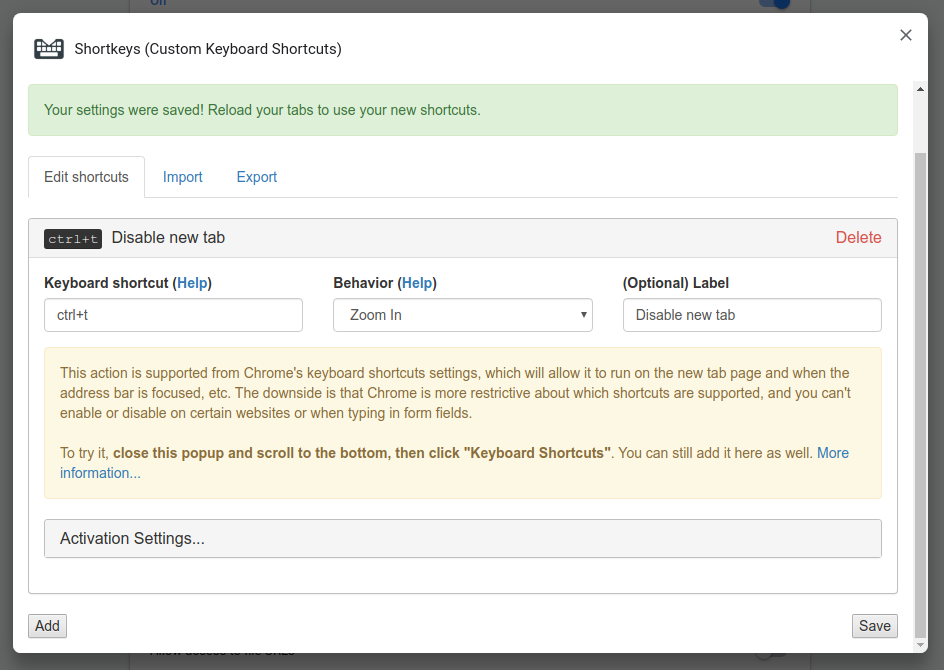
My first thought was to try and disable these shortcuts within Chromimum. As far as I could tell at the time there wasn’t any option to change keyboard shortcuts. There must be usability or security reasons for this but in this situation it sucks. After a bit of searching I found the Shortkeys extension which allows for remapping of commands from a nice gui 🙂 Only one problem. I tried to remap/disable the Ctrl + T command and got this error.


More information here.

Drats! I tried its suggestion and it still didn’t work. Double drats! Eventually I realised that even if did disable some Chromium-specific shortcuts there were still system-wide ones which would still work. Depending on your operating system Ctrl + Q/W will always close a window or quit a program, as will Alt + F4, Super/Windows + D will show the desktop, and Super/Windows + E/Shift + E will open the Home folder. I needed to disable these system-wide.

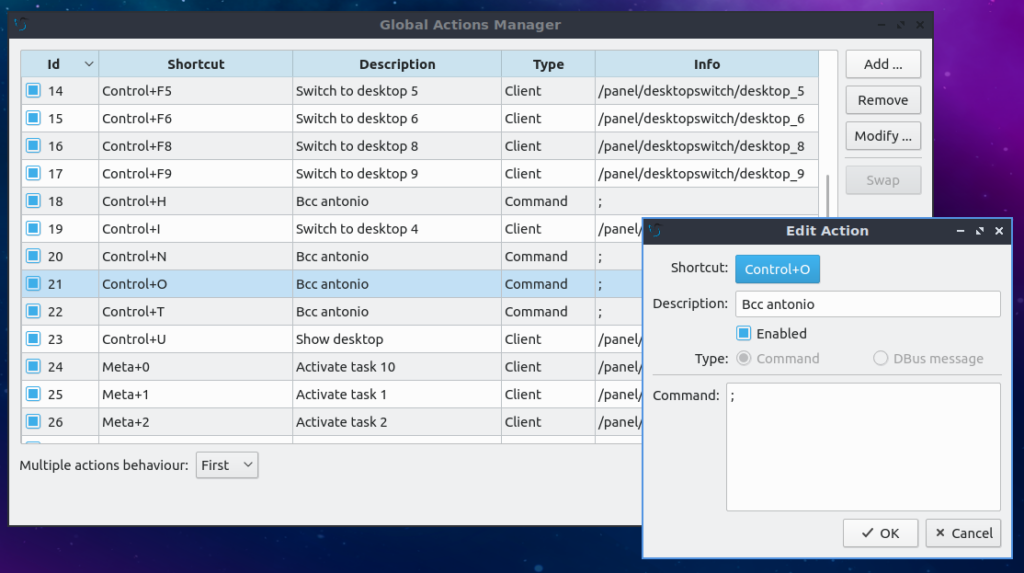
LXQT has a gui for editing keyboard shortcuts. Whilst it doesn’t allow for completely removing a shortcut, it does allow a user to remap them.

As you can see from the screenshot above I “disabled” some common shortcuts by making them execute, well, nothing! Actually it runs “;”, but still that has the effect of disabling it. Huzzah! But what about the other keyboard shortcuts, I hear you ask. Well, this is where I rely on the ignorance of the users. Y’see, as much as it is used within Android phones and basically most web servers, Linux/Ubuntu is still used by a relatively small amount of people. Even smaller is the amount of people using Lubuntu or another LXQT-based Linux distribution. And even smaller is the amount that work in the arts, in Birmingham, and would be at Vivid Projects during three weeks in September, and knew how I installed the work, and… I think you get my point.

During the exhibition anyone could have pressed Ctrl + Shift + T to open a terminal, run killall bcc.sh to kill the script that reopens Chromium, undo the shortcut remappings and then played Minecraft. I was just counting on the fact that few would know how to and few would have a reason to. After all there was some really great art on the screens!

After the exhibition was installed Jessica Rose suggested that one simple solution would have been to disable the Ctrl key. It’s extreme but technically it would have worked at stopping users from getting up to mischief. It would have had the negative effect of preventing me, an administrator, from using the computer to, for example, fix any errors. The solution I implemented, whilst not bullet proof, worked.

That’s the end of December’s Development Updates. Installing Bcc was frustrating at times but did push me to think more about how people interact with technology in a gallery installation setting. It’s never just a case of buying expensive hardware and putting it in front of people. There needs to be processes – either hardware or software based – that protect the public and the artwork. It doesn’t help when lots of technology is built to be experienced/used by one user at a time (it’s called a PC (personal computer) for a reason y’all). Change is no doubt to make it more about groups and collaboration but, y’know, it’ll take time.

Installing Bcc: at Vivid Projects part 2

The next artwork that was challenging to install was Monuments: Psychic Landscapes by Scott Benesiinaabandan.

Bcc:

I won’t be showing the full artwork as all of the artworks were exclusive to Bcc: and it’s up to the artists whether they show it or not. On a visual level the basic premise of the artwork is that the viewer visits a web page which loads an artwork in the form of a Processing sketch. There is a statue in the centre which becomes obscured by lots of abstract shapes over time whilst an ambient soundtrack plays in the background. At whatever point the viewer chooses they can refresh the screen to clear all of the shapes, once again revealing the statue.

On a technical level the artwork isn’t actually that difficult to install. All that needs doing is opening the web page. The difficult part is controlling user interaction.

If you’ve ever been to an exhibition with digital screen-based artworks which allow user interaction via a mouse, keyboard or even touch screen then you’ve probably seen those same screens not functioning as intended. People always find a way to exist the installation and reveal the desktop or, worse yet, launch a different program or website. So, the choice was made very early on to automate the user interaction in this artwork. After all, aside from loading the artwork, the only user interaction needed was to press F5 to refresh the page. How hard could it be?

Well, it’s very hard to do. Displaying the artwork required two main steps:

  • Launch the web page
  • Refresh the artwork after x seconds

Launch a web page

Launching a specific web page on startup is a relatively easy task. Raspbian by default comes bundled with Chromium so I decided to use this browser (more on that later). The Chromium Man Page says that in order to launch a webpage you just need to run chromium-browser http://example.com. Simple! There’s lots of ways to run a command automatically once a Raspberry Pi is turned on but I settled on this answer and placed a script on the Desktop, made it executable (chmod +x script.sh), and in ~/.config/lxsession/LXDE-pi/autostart I added the line @sh /home/pi/Desktop/script_1.sh. At this stage the script simply was:

#!/bin/bash

while true ; do chromium-browse --noerrdialogs --kiosk --app=http://example.com ; done

I’ll break it down in reverse order. --kiosk launches the browser but in full screen and without the address bar and other decorations. A user can still open/close tabs but since there’s no keyboard interaction this doesn’t matter. --noerrdialogs prevents error dialogs from appearing. In my case the one that kept appearing was the Restore Pages dialog that appears if you don’t shut down Chrome properly. Useful in many cases, but since there’s no keyboard I don’t want this appearing.

I wrapped all of this in a while true loop to safeguard against mischievous people who somehow manage to hack their way into the Raspberry Pi (ssh was disabled), or if Chromium shuts down for some reason. It’s basically checking to see if Chromium is open and if it isn’t it launches it. This will become very important for the next step

Refresh a web page

This is surprisingly difficult to achieve! As mentioned before, this piece requires a user to refresh the page at whatever point they desire. As we were automating this we decided that we wanted a refresh every five minutes.

Unfortunately Chromium doesn’t have any options for automatic refreshing of a web page. There are lots of free plugins that offer automatic refreshing. However, at the time that I tried them they all need to be manually activated. I couldn’t just set it and forget it. It could be argued that asking a gallery assistant to press on a button to activate the auto refreshing isn’t too taxing a task. However, automating ensures that it will always definitely be done.

At this point I looked at other browsers. Midori is lightweight enough to be installed on a Raspberry Pi. It has options to launch a web page from the command line and, according to this Stackexchange answer it has had the option since at least 2014 to refresh a web page using the -i or --inactivity-reset= option. However, I tried this and it just wasn’t working. I don’t know why and couldn’t find any bug reports about it.

It was at this point that I unleashed the most inelegant, hacky, don’t-judge-me-on-my-code-judge-me-on-my-results, horrible solution ever. What if instead of refreshing the browser tab I refreshed the browser itself i.e. close and reopen the browser? I already had a while true loop to reopen it if it closed so all I needed was another command or script that would send the killall command to Chromium after a specific amount of time (five minutes). I created another script with this as its contents:

#!/bin/bash

while true ; do sleep 300 ; killall chromium-browser ; done

The sleep command makes the script wait 300 seconds (five minutes) before proceeding onto the next part, which is to kill (close) chromimum-browser. And, by wrapping it in a while-true loop it’ll do this until the end of eternity the exhibition. Since implementing this I noticed a similar answer on the Stackoverflow site which puts both commands in a single file.

And there you have it. To refresh a web page I basically have to kill it every 300 seconds. More violent than it needs to be!

Installing Bcc: at Vivid Projects part 1

I took a bit of a break from writing the Development Updates. September was pretty busy with Bcc: (more on that below) and then I was completing a commission for Will’s Kitchen/The Shakespeare Birthplace Trust and preparing for my solo exhibition, We Are Your Friends.

With all of that now completed I’m writing a few posts about one project in particular: Bcc:

The Bcc: exhibition opened at Vivid Projects on Friday 6th September. It was a collaboration between Vancouver-based Decoy Magazine and Birmingham-based Vivid Projects. The exhibition featured a curated selection of works from Decoy Magazine’s online art subscription service called Bcc:. The basic premise is that each month you’d get specially commissioned art in your e-mail inbox.

Bcc:

Bcc:

After being part of Bcc: in 2018 I suggested to Lauren Marsden, the Curator and Editor of Decoy Magazine, that it could possibly become an IRL exhibition at Vivid Projects. At the time I was still working there so I worked on getting most things in place to get the exhibition going. Then I left in 2019. Because of my prior involvement in Bcc: and the massive technical challenge involved in installing the work (more on that later) I was asked to produce the exhibition.

Depending on how you look at it the technical aspect of installing the exhibition could be very simple. Most of the works in Bcc: were short movies and animations/gifs, and Vivid Projects has long used the Adafruit Raspberry Pi Video Looper to handle playing videos.

Some works, however, required more attention. There were some works that were interactive websites, some that were animated gifs and some that require additional hardware. Prior to the exhibition this probably didn’t present any problems as the works were viewed by most likely one person on their personal phone or computer. The challenge comes when it’s on a shared computer in a public environment. Additionally, operating the works needs to be as hands off as possible. That is, I didnt want it to be the case that myself or another technician had to be on hand every day to go through complicated procedures to turn on all of the work. They needed to be automatic. With 17 works each needing their own computer/Raspberry Pi there was a lot to prepare. Over the next few posts I’ll take you through some of the works and their technical challenges:

Playing gifs on a raspberry pi

Of the 17 works on show in the exhibition 10 were animated gifs. To stay true to the small nature of animated gifs (don’t get me started on the concept of HD gifs) we decided to display the gifs on the Official Raspberry Pi 7″ Touchscreen Display. This proved to be a really good decision overall. It required that visitors get really close to the works and spend time with a format that can sometimes be a bit throwaway.

Bcc:

As mentioned before, for a long time Vivid Projects has used the Adafruiit Raspberry Pi Video Looper software to play videos. It works (mostly) great with the exception that it doesn’t play animated gifs. The main underlying software, omxplayer, only supports video files. Even the supplied alternative player, hello_video, also only plays video files.

Your immediate though might be to just convert the animated gifs to video files. Whilst this “works” there is always the danger that in converting a file you reduce the quality of it. For an artist like Nicolas Sassoon, who makes pixel-perfect animations that match a specific screen size, this would be unacceptable. So I went on a journey to find a way to play gifs.

The requirements for the software is that it should operate in a similar way to the Adafruit software and play a gif on loop with little or no pause between loops. It should play in the frame buffer (i.e. without needing to load the desktop) and it should make use of the GPU (helps prevent screen tearing). And for a bonus it should be able to play a series of gifs one after the other. Simple, right?

TL;DR: There isn’t a reliable way, I had to convert to a video.

Some of the solutions I saw were saying to use Imagemagick to play the gifs. This wouldn’t work as I would need to launch the desktop. Then, I’d need to script it to go full screen, centre the gif, change the background to black etc.

FBI and FIM don’t support animated gifs, although they are useful if you ever want to play a slideshow of static images.

feh is another image viewer that uses the framebuffer. However, it also doesn’t support animated gifs and, according to this response from the author, this is by design.

This suggested solution of converting to images kinda works but doesn’t take into account if each animation frame has different durations (see this GIMP tutorial for example on how to use it). With that in mind for this to work I would need to get the duration of each frame in each of the 10 gifs, separate the gifs into their individual frames, and then tell feh to play each frame for it’s specified duration. So, this method could work but it would require a lot of work!

This thread on the Raspberry Pi forum did provide a possible solution which I didn’t try but it also pointed me to FBpyGIF, which was certainly the most promising of the solutions. However, a couple of problems prevent me from using it. Still very promising though!

Finally, I tried one of the various GIF Frames that play a folder of animated gifs on loop. Sounds like it works but there’s screen tearing on some fast-moving gifs. I’m guessing this is because it doesn’t have hardware acceleration and/or because it uses Chromium to play the gifs.

Soooooo after all of this I felt a bit defeated and I decided to just convert the animated gifs to videos. I used Handbrake and noticed no loss of quality in the conversion. Even if there was, on a 7-inch screen it’d be quite hard to see. Using the Adafruit player/omxplayer I was initially having some issues with aspect ratio. Even with –aspect-mode set to fill stretch or letterbox, the videos were being stretched to fill the screen. To illustrate take the following video, which is 1024×68/4:3.


(fyi it was made using Natron and this script to add in a timecode)

When play on the screen it is stretched to fill the screen.

The Raspberry Pi touch screen has a resolution of 800 x 480, which is a 5:3 aspect ratio. Most of the videos and animated gifs were HD/16:9 so would be letterboxed by default.

So I had the bright idea of padding each video so that it was exactly 800×480.

Now, the Adafruit player/omxplayer says it can play any video which is H.264 encoded but I’ve had some troubles in the past, so whenever I’m given a video I usually convert it using Handbrake with the Fast 1080p30 preset. These settings have always worked for me but for some reason on this occasion the video was stuttering a lot! What was strange was that the original videos (the animated gifs converted to videos without resizing) played fine. Even after they were run through Handbrake. Why when they were converted to 800×480 size did they stutter?

It was two days before the exhibition opening that I remembered that some time in 2016 I had an issue with omxplayer in that it didn’t play videos if the video didn’t have an audio track. Why? I don’t know. Maybe audio was the problem in this scenario too? It was worth a try and so I decided to disbale the audio track using the -n -1 option. This doesn’t just turn the audio down, it disable encoding of it. And guess what. IT WORKED!

I have absolutely no idea why this worked or why the error ocurred in the first place. Here’s the extra arguments that I included on line 107 of video_looper.ini.

extra_args = --no-osd --audio_fifo 0.01 --video_fifo 0.01 -n -1 --aspect-mode stretch

All of that just to play animated gifs! Now that I had the code perfected copying it to all of the other Raspberry Pi’s was simple. If the aforementioned softwares had animated gif playback by default then this would’ve been solved much quicker but for now it seems the most reliable way to play animated gifs on a loop on a Raspberry Pi is to convert them to video.

What’s happening on Twitter

The following is compiled from a bunch of Tweets that I made in December 2018. After reading you’ll see why I have to write it here! While it is not directly related with programming or making art, it does help with Getting Things Done, so I decided to include it here.

Like many people I’ve started to remove myself from a lot of social media websites. First was Facebook in 2017. The reason for this is that was really annoyed that it was using nostalgia to manipulate me into staying on the website. In shoving 10 year-old photos into my view through the On This Day feature it was giving me little hits of dopamine by reminding me of the good ol’ times, even if they were 10 years ago with people that, for whatever reason, are no longer part of my life.

One solution to this was to make sure that Facebook only had recent information about me. I started manually deleting anything that was more than 2 year old. I eventually found a Chrome plugin (use at your own risk) that made it easier to do but this process was a chore that ultimately didn’t solve the fact that Facebook was the problem. After about a year I left unannounced. After deleting my account, of course.

My “relationship” with Twitter is a bit different. I’ve always preferred it over Facebook as it isn’t as intrusive, at least not directly. It doesn’t constantly ask you to share who you’re dating, identify your family, upload photos from your night out or tag your friends in everything. Instead it felt like it was more concerned with what was happening at that moment.

Like Facebook, though, I became a bit concerned with how much data about me it was storing. I started using the website in 2008 (Facebook in 2007) and have used it almost daily since then. Over that time I have grown and changed as a person many times over. I don’t want this history to be fully documented and, more importantly, available for anyone to browse through. Whilst the majority of the 40k tweets I accumulated over that period probably consists mostly of cat gifs, memes and the word “lol”, maybe there’s there events that I’d rather not have documented, like Tweets showing friendships and relationships falling apart, embarrassing photos of myself or others on nights out, or even just me saying something that was totally out of order.

I’m glad that I have friends (and enemies) that have called me out on my bullshit and hope that they continue to point out times when I do something wrong. However, I’d rather that the trail of data I leave on these sites that I use every day reflected me as I am now, not who I was 10 or even 20 years ago.

So, I went on a mission to find a way to keep my Tweets current. I needed a tool, or tools, that would automatically delete Tweets older than a certain time period.

A lot has been written about Tweetdelete. However, I don’t want to rely on a third party service. Many people do trust the service, but there’s always risks in using third party services, especially when they have access to a lot of your information. Then there’s the risk that it could one day shut down so I decided that I wanted something that I could deploy myself.

Deploying your own script requires that you register a developer account on Twitter.

Delete tweets is a Python script that let’s you delete tweets and specify a cut off date. However, to run it you need to download your Twitter archive. At the time of writing this can only be done once a month and has to be done manually. So, you could automate the running of the script but there’s still manual intervention required.

This Python script is similar but it lets you specify cutoff date as a number of days, not dates. Still, it requires downloading your Twitter archive manually.

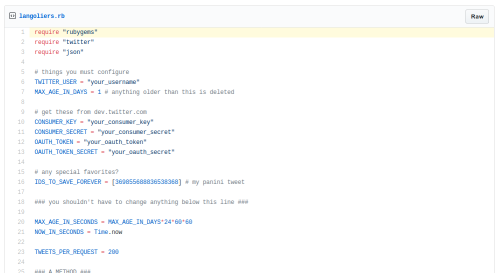
This Ruby script works perfectly! You specify cutoff point in days and then when it is run it deletes any tweets older than that cutoff point. It even has the option to put in the ID of Tweets that you want to save. It only requires a developer account and you don’t need to download your archive.

There’s even a companion script that removes Likes. This doesn’t have any options for date cutoff but in my case it doesn’t matter. Once I’ve liked something once it doesn’t mean that I like it (or anything else that person has posted) forever so I’m not sure why I need to have my likes recorded and archived.

I decided to install both scripts on an always-on Raspberry Pi. Installing them took a bit of time due to it needing to install a bunch of Ruby gems. Once it was installed I set up a cron job to run the script at regular intervals. I have mine set to twice a day and to only keep the last two weeks of tweets. I feel that that is enough time for the tweets/memes to have whatever impact that they’re going to have. After two weeks they’re gone.

All of this effort to manage my experience of using Twitter might not be a solution and instead might be more of a distraction from the fact that the problem is Twitter, and maybe even social media in general. There have been many efforts from individuals to make social media better. On Facebook there is F.B. Purity which helps remove things like adverts, the On This Day feature and other things.

One of my favourite tools that I still use is the Facebook and Twitter Demetricator from Ben Grosser. These desktop-only tools remove mentions of the number of Likes, replies and retweets a post gets so that you can focus on the cat memes important things. These plugins have been getting a lot of attention recently. See Ben’s Instagram for more.

This of course doesn’t solve social media’s problems but just makes my experience of it just that little bit less stressful.

Select objects of similar size in Inkscape

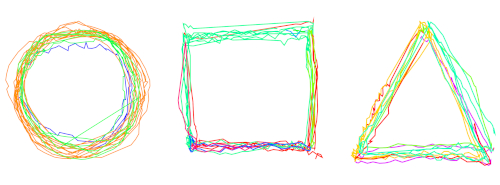
For the AlgoMech 2019 festival in June I created a new performative drawing piece, A Perfect Circle. The piece is about how we interface with computers that analyse our activities. It consists of a video and accompanying plotter drawings.

Making A Perfect Circle presented me with a few challenges. The make the video element I hacked together a couple of Processing scripts that did basic motion tracking by following a user-specified colour. It would draw these lines, creating new lines (instead of adding to an existing line) at each major turn and giving them a unique colour.

The next stage was to export those drawn lines to SVGs (or PDFs) so that I could export them to Inkscape and then a plotter. Fortunately Processing already has functions for exporting to SVGs. Unfortunately for me if I were to implement this as is suggested in the help file it would export both the drawn line and the background video as a still frame. I produced a very hacky workaround (with help from Ben Neal) which “works” but produces a few unwanted artefacts.

Before I go on I should probably explain what a plotter is as the unwanted artefacts relate to it. For this I will copy from the Wikipedia article on plotters:

The plotter is a computer printer for printing vector graphics. Plotters draw pictures on paper using a pen. In the past, plotters were used in applications such as computer-aided design, as they were able to produce line drawings much faster and of a higher quality than contemporary conventional printers, and small desktop plotters were often used for business graphics.

At home I have a Silhouette Cameo 2 vinyl cutter. When using this great Inkscape plugin I can bypass Silhouette’s proprietary software and send artwork directly to the cutter from Inkscape. Thanks to a pen holder adaptor I can replace the vinyl cutting blades with a pen and turn the vinyl cutter into a plotter 🙂

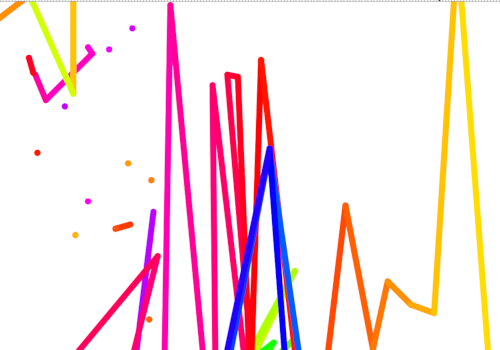
Back to the Processing sketch. The hacky code that I made produced the desired lines but also it had lots of additional single-node paths/dots at the start of each line.

Removing these wouldn’t be very easy. Using Edit > Select Same > Fill and Stroke or Fill Color or any of the other options wouldn’t work as it would also end up selecting the lines. I then had the bright idea to select objects based on their size. All of the dots had a dimension of 4.057×4.000px, so in theory there would be an option like Edit > Select Same > Size. However, this is not so.

After a discussion on the Inkscape forum I opened a feature request on the Inkscape bug tracker to select objects of similar size. One thing I added to this was the idea of a threshold. Using this you could select objects that were within n% of the size of the selected object. If you’ve ever used GIMP you would have seen a similar function in its fuzzy selection tool This could definitely be useful if you trace bitmaps and it produces a lot of speckles. I also added a mockup to show how it could be applied to other options in the Edit > Select Same menu options.

Anyway, at the moment this exists as a feature request. I think Inkscape is concentrating on delivering version 1.0 of the software so I don’t expect to see this implemented any time soon. As with anything in the land of open source, if you’ve got the skills to do this please contribute!

In the end I used fablabnbg’s Inkscape extension to chain all (or most) of the paths into one big path. This made selecting the dots easier as I could just hide the big path(s) once they were chained together.

After that it was a simple case of sending it to the plotter!

Convert Object texture coordinates to UV in Blender

Making digital art is quite a lengthy process and even moreso if you’re using non standard processes or making your own software. For awhile I’ve wanted to write about my processes and how I’ve overcome the bugs and problems. In what will hopefully be a regular series of blog posts I’m going to give a bit of insight into this process. In a way it’ll be a tutorial. Let’s go!

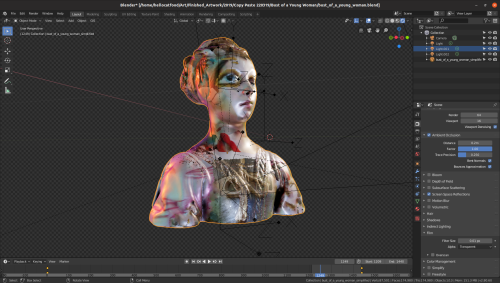
For Visually Similar I wanted to texture each 3D model using lots of images found on the internet. Rather than create one single material containing a texture with all of the found images I instead decided I would add a material for each image texture and, using their alpha channels, composite them over each other.

If you’ve ever had to position something accurately on a UV map you’ll know how much of a pain it can be. So fortunately, in the Texture Coordinate node you can use the Object outlet to another object (usually an empty) as the source of its coordinates. This uses the reference object’s local Z direction as its up direction.

So far,so good, except it did not yet work in Blender’s new EEVEE rendering engine. Yes, yes, I know EEVEE is still under development and shouldn’t be used in production etc. Still, after doing a bit of research it looks like this is going to be implemented.

So, I had a rather smrat idea as a workaround. Could I take the UV coordinates generated by the Object oulet whilst using Cycles and paste those into the UV texture options using a Mapping node? Short answer: no. To do this I would need some sort of viewer or analyser node that would show me the data being output from a node. So, I suggested this idea on the Right-Click Select ideas website. A healthy discussion followed and hopefully something will come of it.

In the end I had to resort to baking the texture and then applying that to the 3D model. In doing this I learnt that baking a UV texture on a complex model will take a lifetime, and so I had to do it on a decimated model and then put that on the original, complex model. This, of course, created some unwanted artefacts. *sadface*

Since I originally encountered this problem it has actually been addressed in a Blender update! However, it only works at render time but it’s progress! 🙂

So that is some insight into how I make some of my art. There’s a lot of problem solving, lots of showstopping bugs and lots of workarounds. Somewhere in that process art is made! I’m hoping to do these every month but we’ll see how that goes.

Five Days of Pure Data – Live Coding

In the years that I’ve been creating things in Pure Data I have amassed quite a collection of unfinished and messy patches. Over the last few days I have been releasing a few of these patches and techniques that I implement when programming in Pure Data.
Live Coding

The last tutorial isn’t that much about actually programming with Pure Data and is more about performing with it. More specifically, live coding. Live coding takes programming to a performative level. There’s been a lot of writing recently about Live Coding so take a look around. I’ve been programming live visuals for Pure Data since 2014 (a lot happened that year). It’s not without it’s problems, some of which I written about in the past.

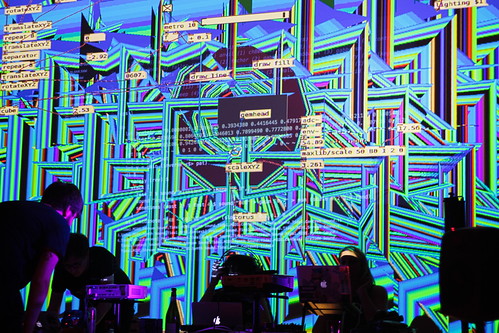
One problem I’ve found is displaying your patch alongside your visuals. For live coding musicians this isn’t much of a problem as the output of the live patching is sent to the sound card, not necessarily the screen. For people live coding visuals in Pure Data the output (projector) would be needed for both the visuals output and the patch. If only there was a way to overlay the patches onto visuals (like in Fluxus, Cyril and Livecodelab)!
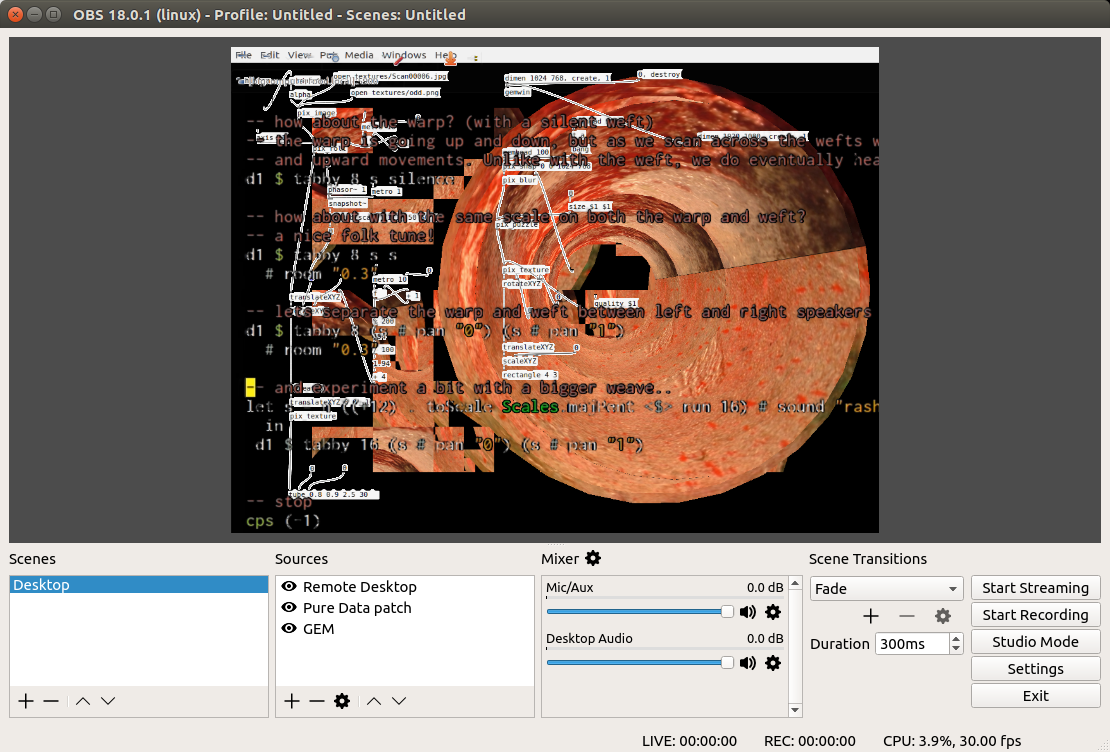
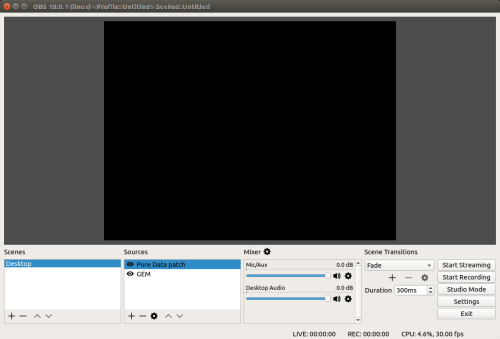
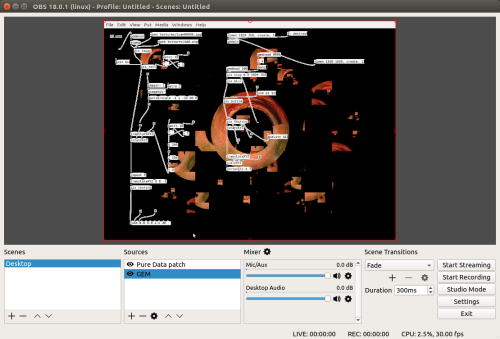
The most reliable cross-platform method to do this is to use Open Broadcaster Software (OBS). OBS is a great piece of software used by many gamers for livestreaming. A great feature of it is to be able to combine multiple media sources into one to then stream or send to a projector or video file.

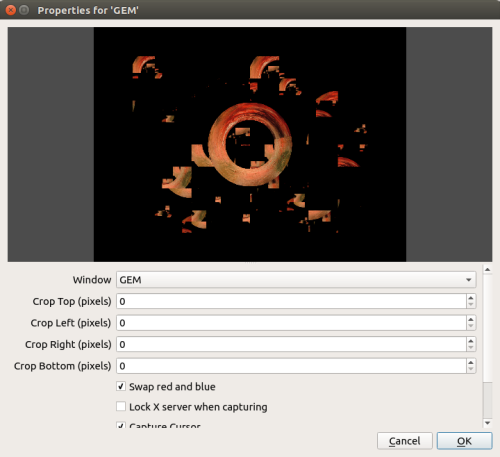
To overlay your patch onto your visuals first create a GEM window with some graphics in it. In OBS, under Source click the + button and choose Window Capture. Give the new source a name. And then, under Window choose your GEM output window.

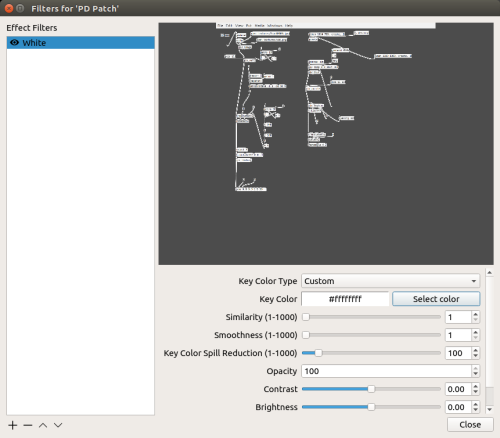
Next, create a new Window Capture source and give it a name (perhaps Pure Data patch). You may have noticed that your patch completely covers your GEM source. No worries! Right-click on your Pure Data patch source and click on Filters. In the next window click on the + button and choose Chroma Key. Give the new key a name (White).

In the next window, under Key Color Type choose Custom and then select the colour. You should choose white (#FFFFFF). You may need to change the settings under Similarity and Smoothness to get the right look.

If you’ve just tried this in Pure Data vanilla you’ll notice that your objects are also transparent. I’m using Purr Data (which you should too). In this version of Pure Data all of the boxes are slightly grey, resulting in them not being transparent when you apply the Chroma Key.

Imagine a scenario where you’re collaborating on an Algorave set with a musician and there’s only one projector. Both will want to project their code but there’s only one projector. What to do?! Luckily a combination of OBS and desktop sharing has you covered.

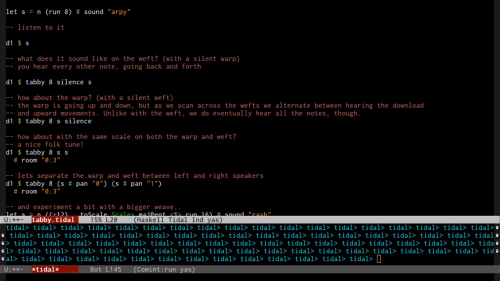
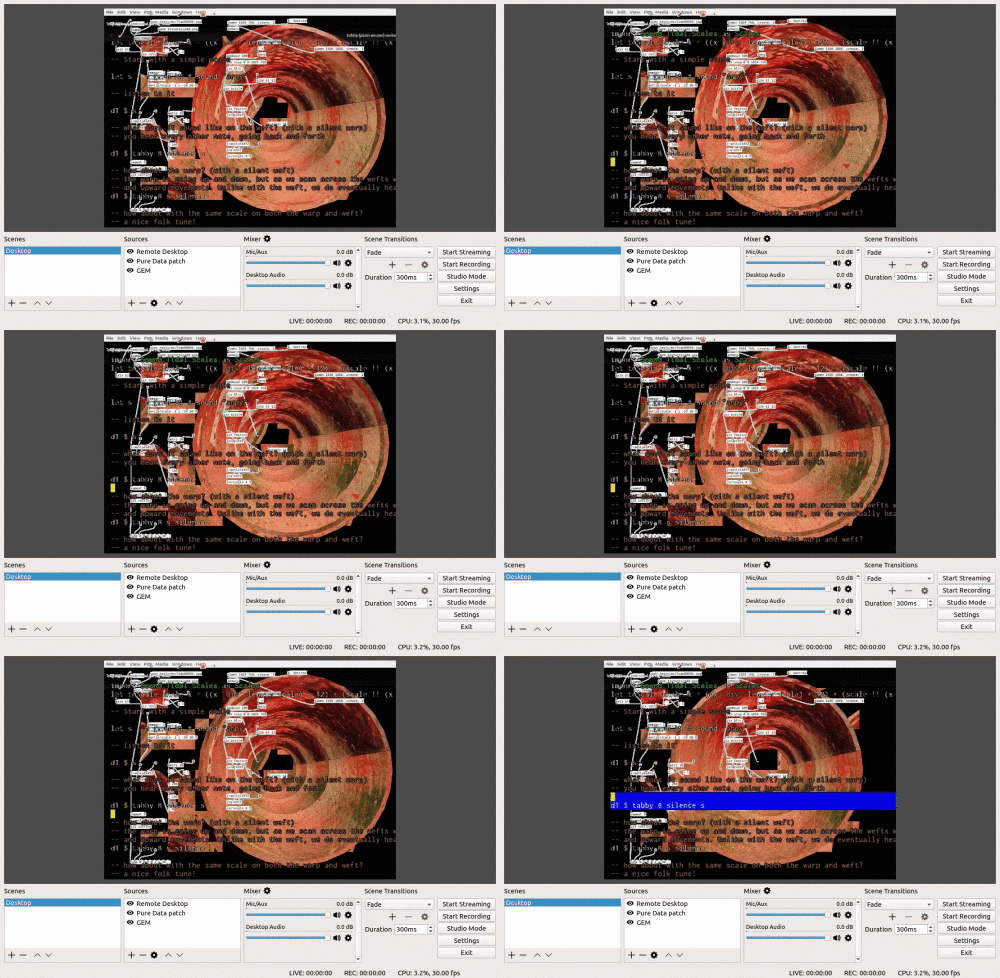
TidalCycles code from yaxu

If the musician can share their desktop over a network then you can add that in as a source in OBS and do the usual thing of applying a chroma key filter. However, this requires you both be on the same network, which isn’t always possible or efficient. However, if one of you has a recent Android phone you can get over this hurdle and have high quality desktop sharing quality.

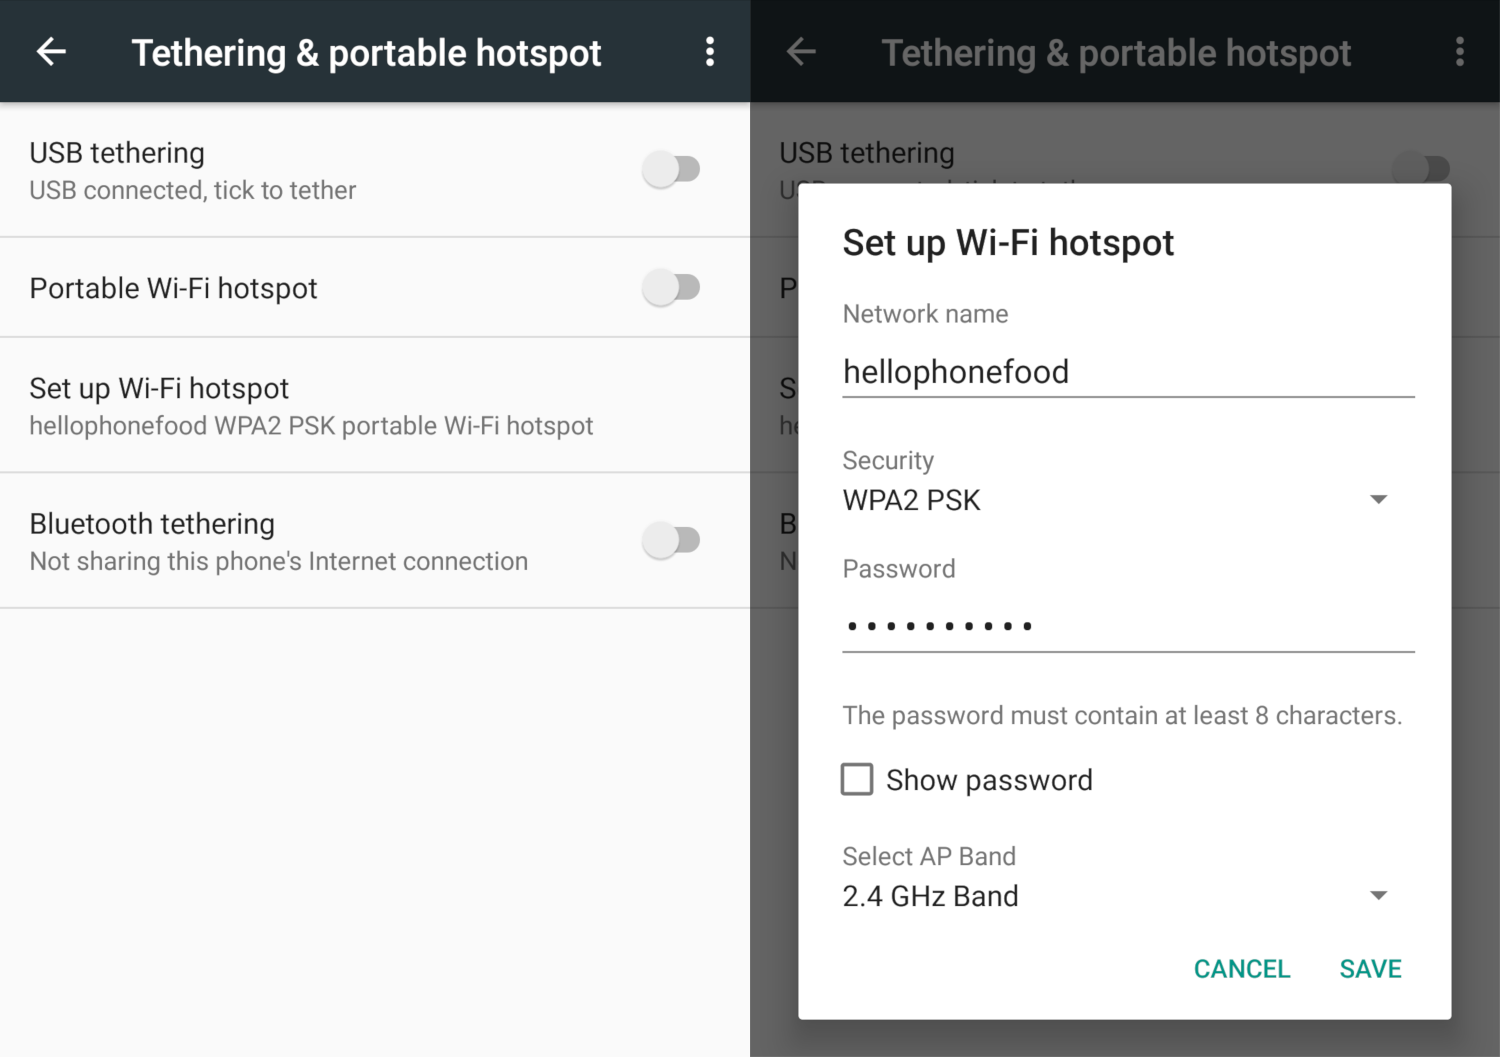
On your phone create a wireless hotspot. You don’t need to use mobile data for this so feel free to turn it off.

Connect both machines to this newly created network.

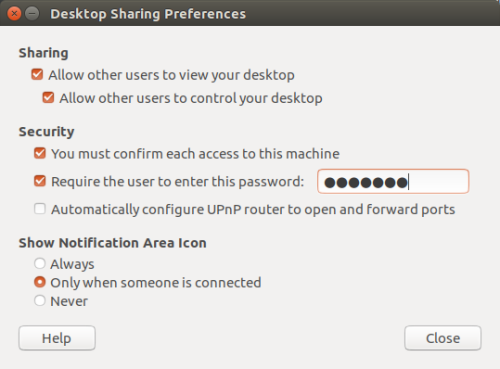
On the remote (musicians) laptop, open Desktop Sharing options and enable the option “Allow other users to view your desktop”. You can choose to require a password and have a user confirm on each new access request.

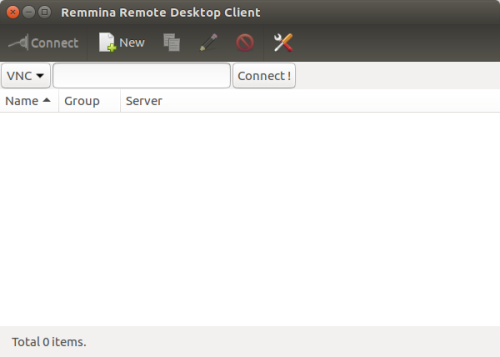
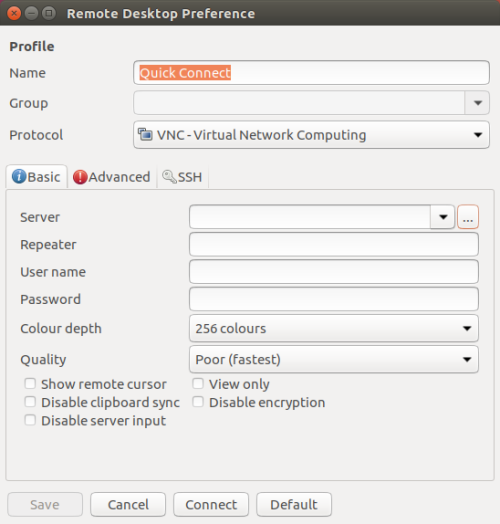
On the host (visuals) machine open Remmina Remote Desktop Client.

In this new window click New. In the next window change the Protocol to VNC – Virtual Network Computing. In the Basic tap below click on the … button.

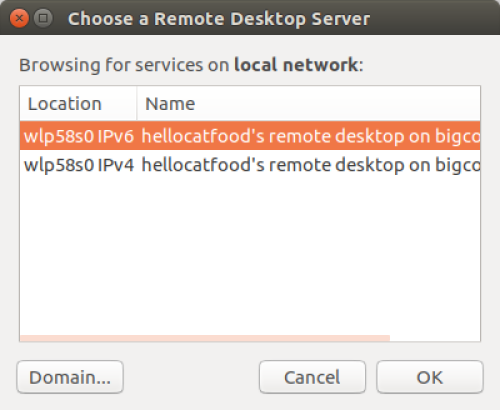
You should see the name of the remote computer listed. Click on one of them.

Finally, press Connect. When you try to connect to the remote machine you may get a prompt asking the user to confirm that the connection request is permitted.

Once the connection is approved you should see the remote machine on your computer!!! 🙂 And now you can go back to OBS and add that window as a source, apply a Chroma Key effect and then overlay it onto your visuals.

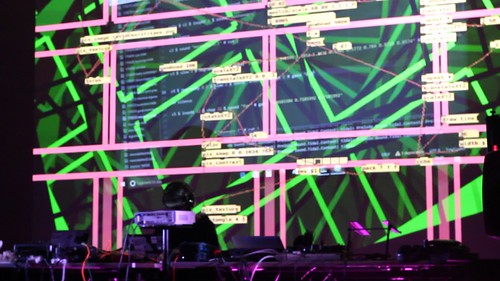
Sadly you can’t then use this source to apply as a texture to your objects in Pure Data, but it’s a great start to merging visuals and music live code. I first tried out combining my own code and visuals at the Chemical Algorave in Newcastle and it went really well. I also made use of OBS’s “Apply LUT” filter to change the colour of my whole video output.

MVI_3763

Chemical Algorave

I then tried incorporating a musicians code at the Algroave at BUMP in Kortrijk.

A post shared by Antonio Roberts (@hellocatfood) on

I’m hoping that this will help lead to more collaborations between Algorave musicians and visual artists 🙂